I watched a video get made, start to finish, without a single human touching a timeline editor. No Adobe Premiere. No CapCut. No video editor at all. Just Claude, the HeyGen MCP, and HyperFrames working together to produce a polished MP4 with avatars, music, sound effects, motion graphics, and transitions.
The video was 100% AI-generated. It matched a brand's colors, fonts, and visual identity. It had a branded outro, a call-to-action, and voice-directed narration.
That is the HeyGen MCP + HyperFrames pipeline.
In this guide, I break down the exact workflow, from installing the MCPs to building a design system, creating a reusable video skill, and rendering your first AI video. I also cover best practices, use cases, and the two rendering options you need to choose between. Whether you're a content creator, marketer, or agency, this pipeline can save you days of production time every week.
Key Takeaways
https://mcp.heygen.com/mcp/v1/, no API keys needed, just OAuth.What Is HeyGen MCP + HyperFrames?
Before getting into setup, let's define what these two tools actually are and why they work so well together.
HeyGen MCP: The Video Generation Bridge
HeyGen MCP is HeyGen's implementation of the Model Context Protocol, a communication standard that lets AI agents interact with external platforms directly. The MCP server lives at https://mcp.heygen.com/mcp/v1/ and gives Claude permission to call HeyGen's Video Agent without leaving the chat or code environment.
Once connected, Claude can generate avatar videos, retrieve projects, trigger translations, and run lip-sync operations, all from a single prompt. Authentication happens via OAuth tied to your HeyGen account. No API keys to rotate or expose.
HeyGen has over 230 AI avatars and supports 140+ languages. The platform also supports voice cloning, so you can deploy your own avatar if you prefer a personal brand face instead of a stock presenter.
HyperFrames: HTML-to-Video for AI Agents
HyperFrames is HeyGen's open-source framework for turning HTML compositions into MP4 video files. Instead of working with a video timeline editor, you write HTML, CSS, and JavaScript. HyperFrames captures those frames and encodes them into video using FFmpeg.
The key difference from traditional video tools is who writes the code. AI agents, specifically Claude Code, Cursor, Gemini CLI, and Codex, can write and edit HyperFrames compositions directly from prompts. You describe what you want. The agent builds the HTML. HyperFrames renders the video.
HyperFrames supports GSAP, Lottie, Three.js, Anime.js, CSS animations, and WAAPI. That means anything you can animate in a browser, you can render as a video frame. The output renders at 4K or 1080p, depending on your settings.
Find the official documentation at hyperframes.heygen.com and the GitHub repository at github.com/heygen-com/hyperframes.
The Two Rendering Options Explained
This is one of the first decisions you make in the workflow. The pipeline gives you two paths for turning Claude's output into a finished video.
Option 1: HyperFrames (Premium Quality Output)
HyperFrames handles the full production stack, it takes the avatar video from HeyGen, adds the music, SFX, motion graphics, cuts, and transitions, then renders everything as a single MP4. The output quality is high. You get a polished, branded video.
The trade-off: HyperFrames uses more HeyGen credits. If you plan to produce videos at volume, this cost adds up. Use this option when quality matters more than credit efficiency, product launches, YouTube content, client deliverables.
Option 2: Claude's FFMPEG + HTML System
This is the leaner alternative. Claude handles the graphics and motion using HTML + CSS + JavaScript, then encodes the final video using FFmpeg locally. It avoids HyperFrames' credit consumption and still produces a clean output.
The trade-off: the visual complexity is lower. You get solid motion graphics, but not the same rendering fidelity as HyperFrames' dedicated pipeline. Use this option for quick-turnaround content, internal videos, or high-volume production where credit costs matter.
My honest take: I prefer HyperFrames for anything going public. The output looks noticeably more polished. For bulk or internal content, the FFMPEG system is more than good enough.
Step 1: Install the Two MCPs
You need both HeyGen MCP and HyperFrames MCP installed before running any of this. Here's how to set up each one.
Install HeyGen MCP in Claude Desktop
For Claude Desktop, the process is a custom connector install:
https://mcp.heygen.com/mcp/v1/For Claude Code users, run this command in your terminal:
claude mcp add --transport http heygen https://mcp.heygen.com/mcp/v1/
To make it available across all projects, add the -s user flag:
claude mcp add --transport http -s user heygen https://mcp.heygen.com/mcp/v1/
Verify the connection with:
claude mcp list
You should see heygen listed with a connected status. Full official setup instructions are at developers.heygen.com/mcp/claude-code.
Install HyperFrames MCP
HyperFrames is available directly in the Claude connector library. The process mirrors the HeyGen setup:
For Claude Code or agent environments, install the HyperFrames skills package:
npx skills add heygen-com/hyperframes
The installer shows a skill picker. Select the core set: /hyperframes, /hyperframes-core, /hyperframes-animation, /hyperframes-creative, /hyperframes-cli, /hyperframes-media, and /hyperframes-registry. To install everything at once:
npx skills add heygen-com/hyperframes --all
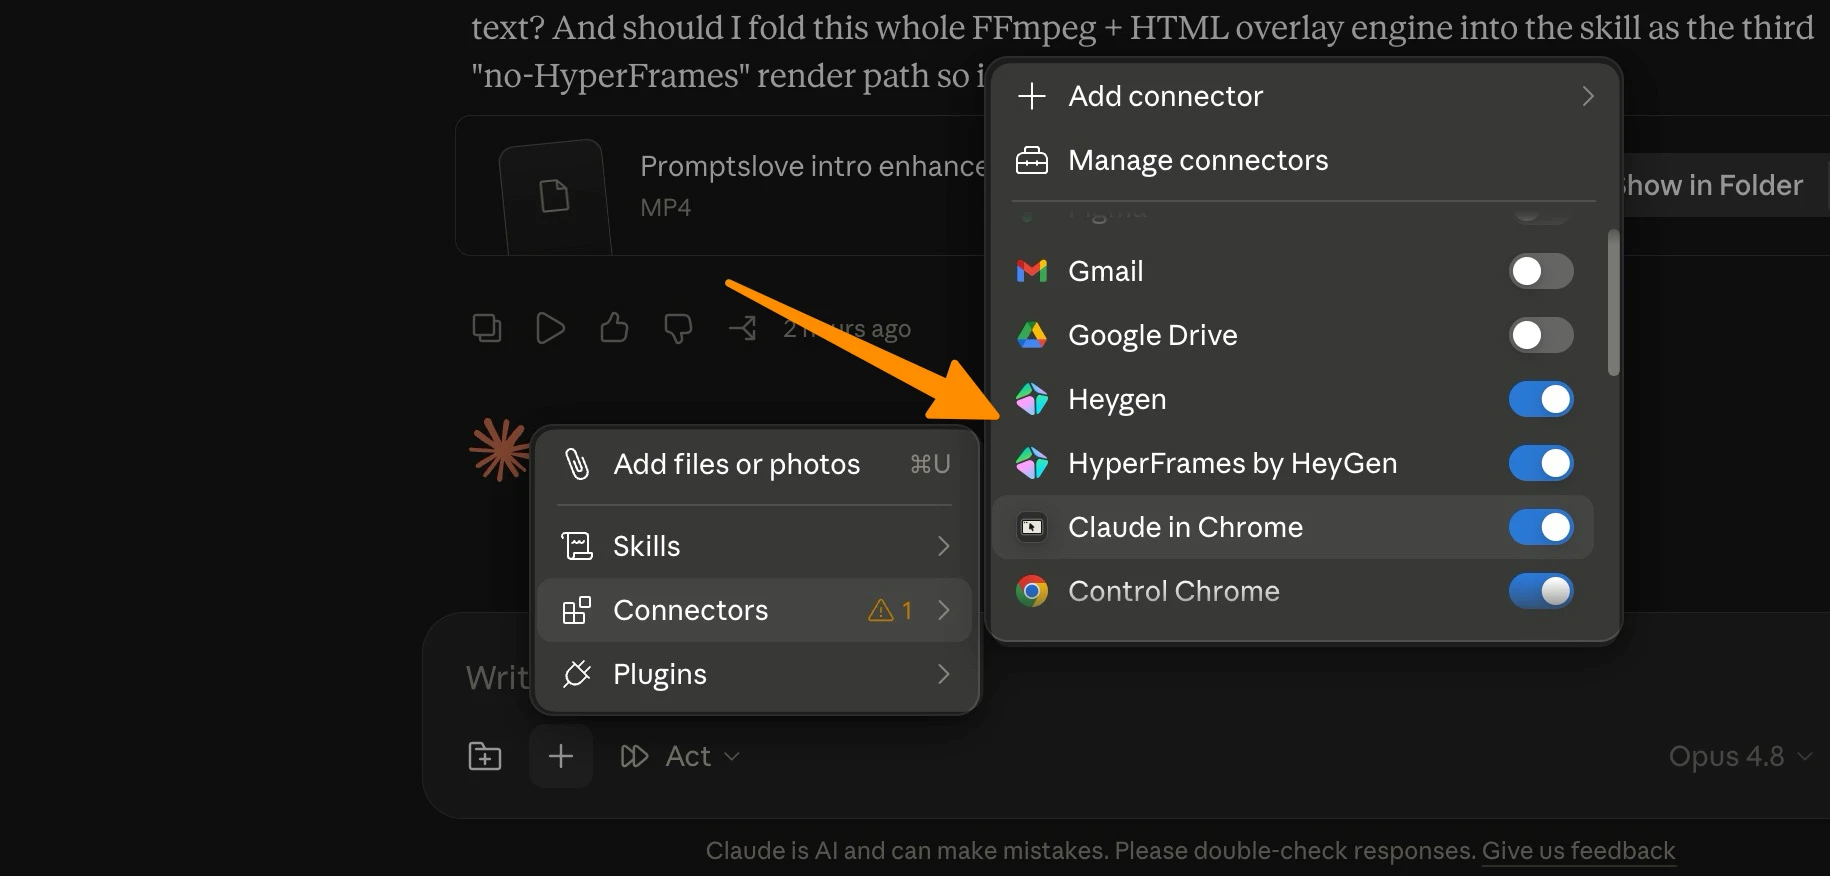
Once both MCPs are installed, enable them in your session. In CoWork or Claude Code, click New Session, then enable both HeyGen and HyperFrames connectors.
Prerequisites for HyperFrames local rendering:
node --version)brew install ffmpeg on Mac, sudo apt install ffmpeg on Linux)Step 2: Build Your Design System

The design system is the file that tells the AI how your brand looks. Without it, every video comes out with generic styling. With it, every video uses your exact brand colors, fonts, and visual identity.
You need a design.md file before running the pipeline. There are two ways to get one.
Option A: Export From claude.design
If you already have a design system defined on claude.design, export it as a ZIP archive:
This ZIP contains your full design system as a structured file Claude can read directly.
Option B: Use Google's Free Stitch Tool
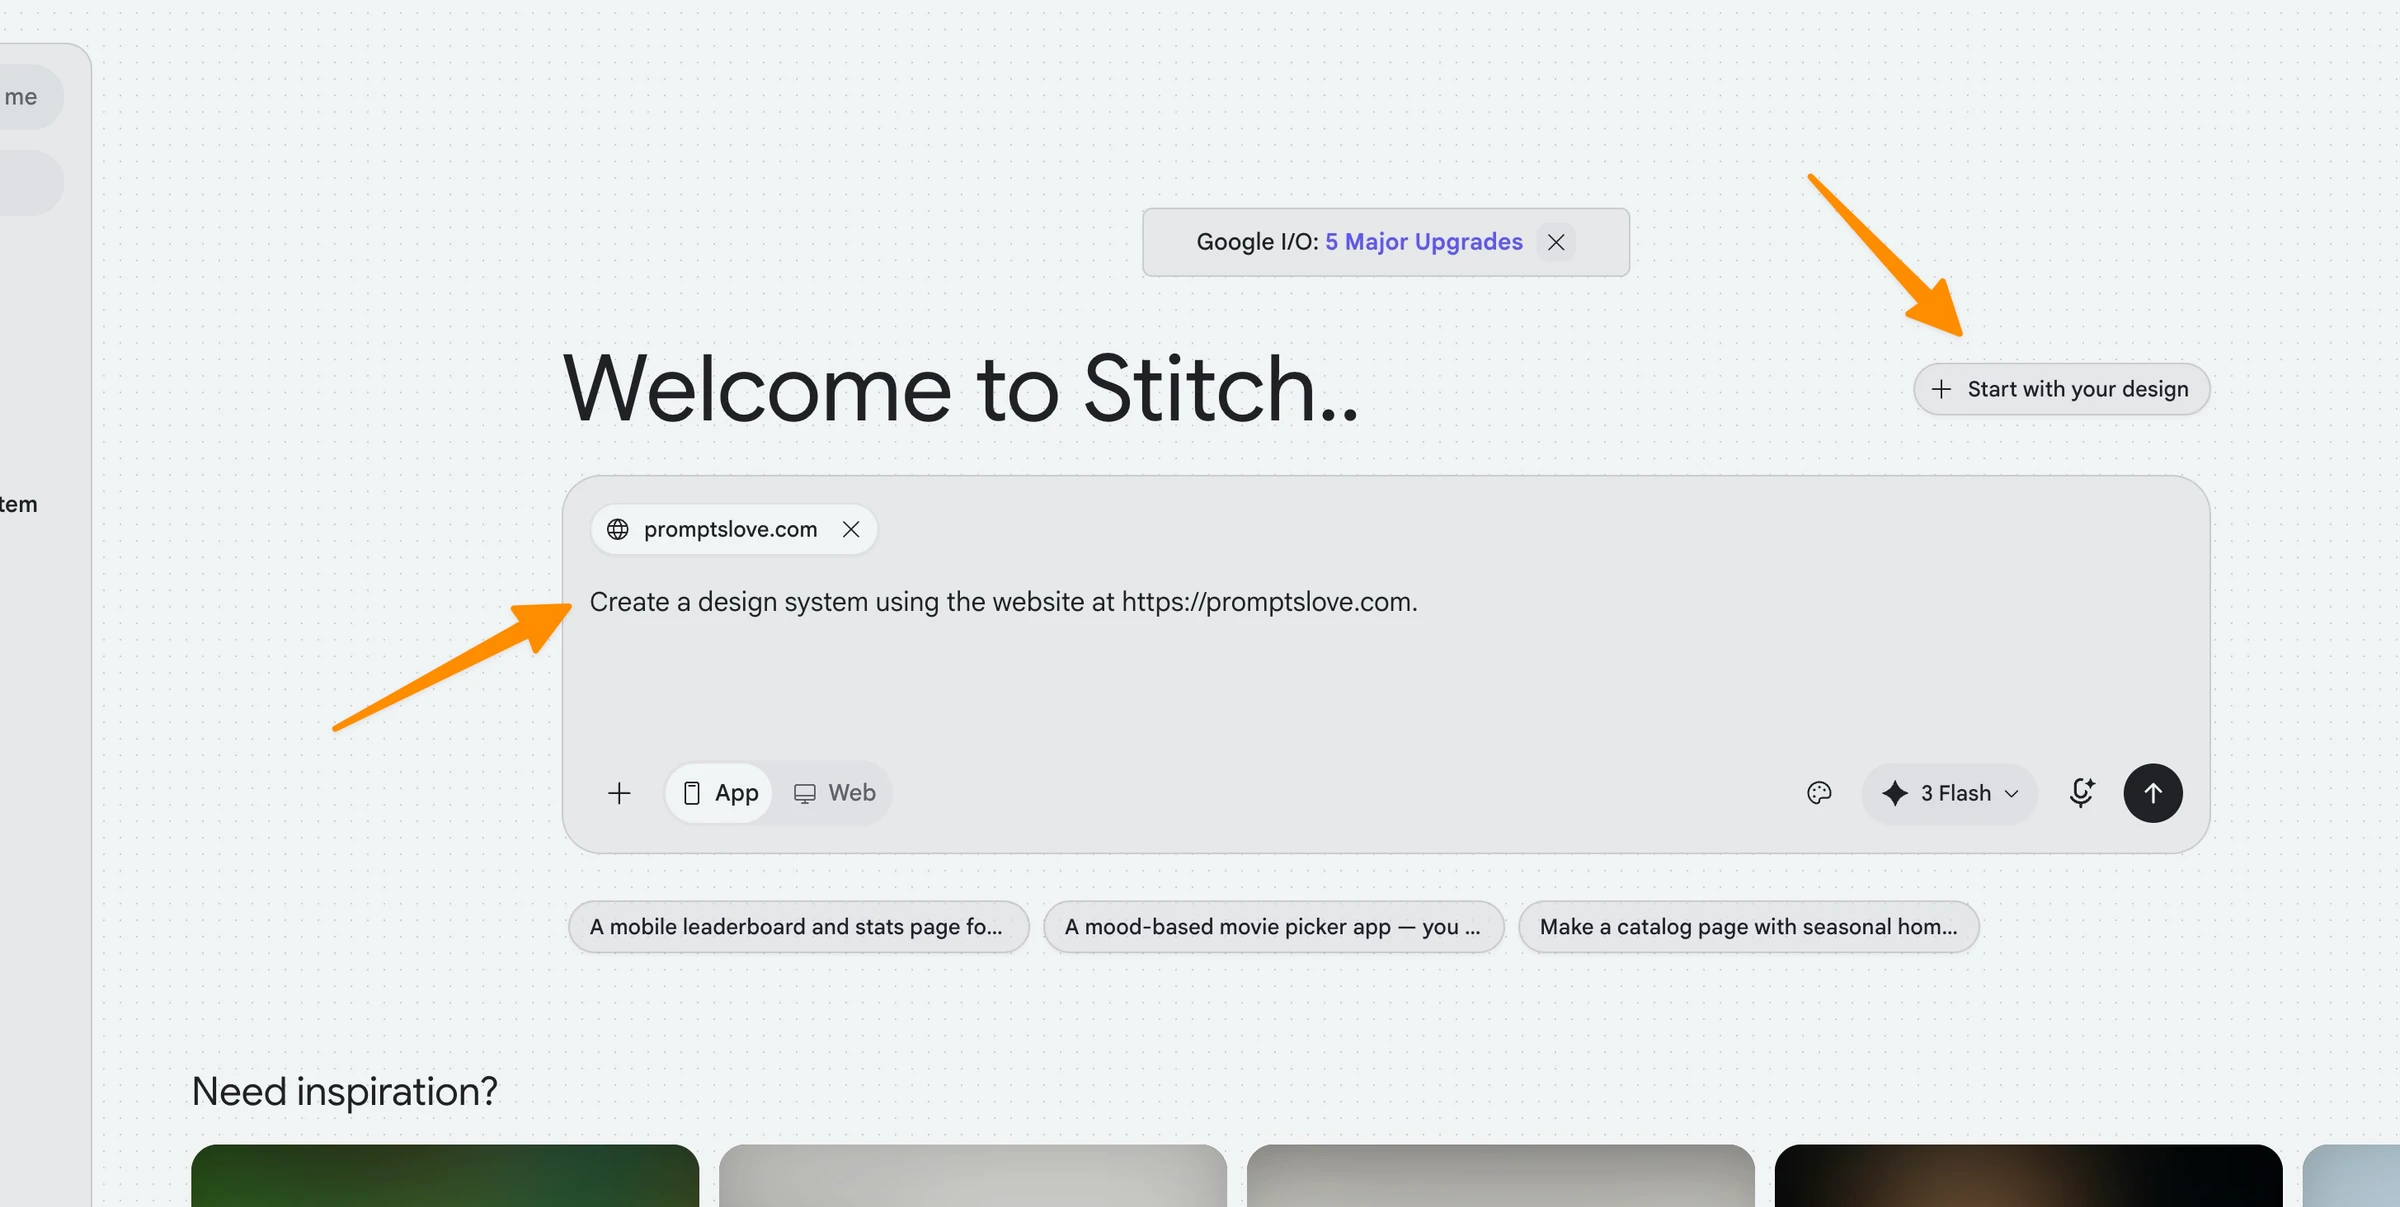
If you don't have an existing design system, Google's Stitch tool at stitch.withgoogle.com generates one from your website automatically. It's free and takes about two minutes.
Here's the process:
yourwebsite.com) and click Continuedesign.md file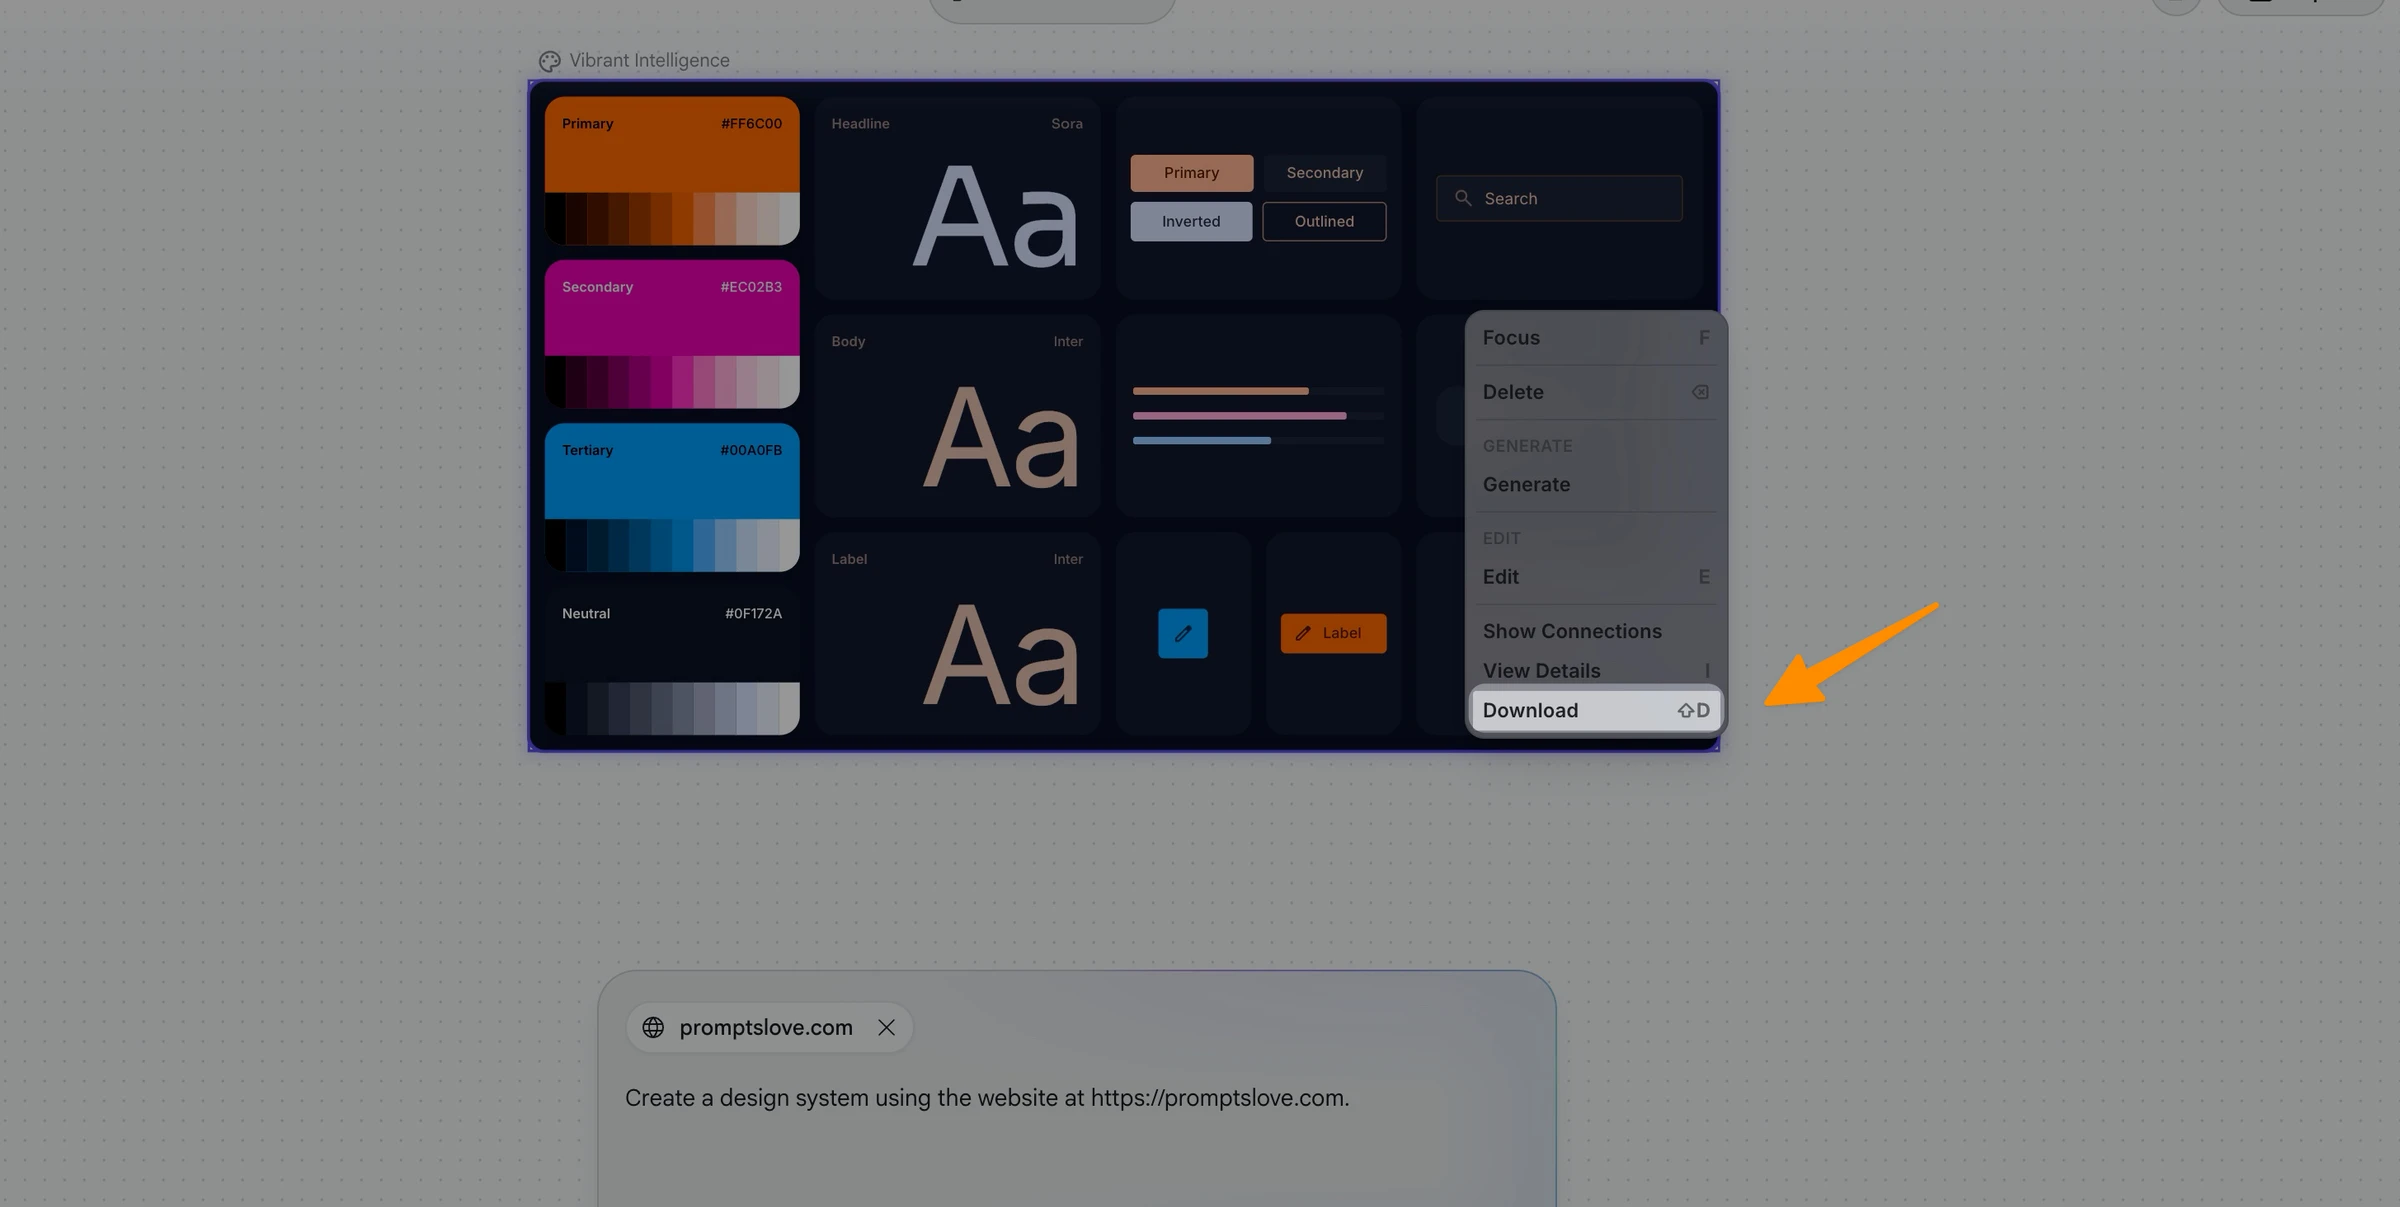
You can also upload a Figma file, a GitHub repository, existing images, or other brand files instead of a URL. Stitch accepts most common input formats.
Once you have your design.md file, add it to your Claude session or project folder. This is the file the AI will read to understand your brand.
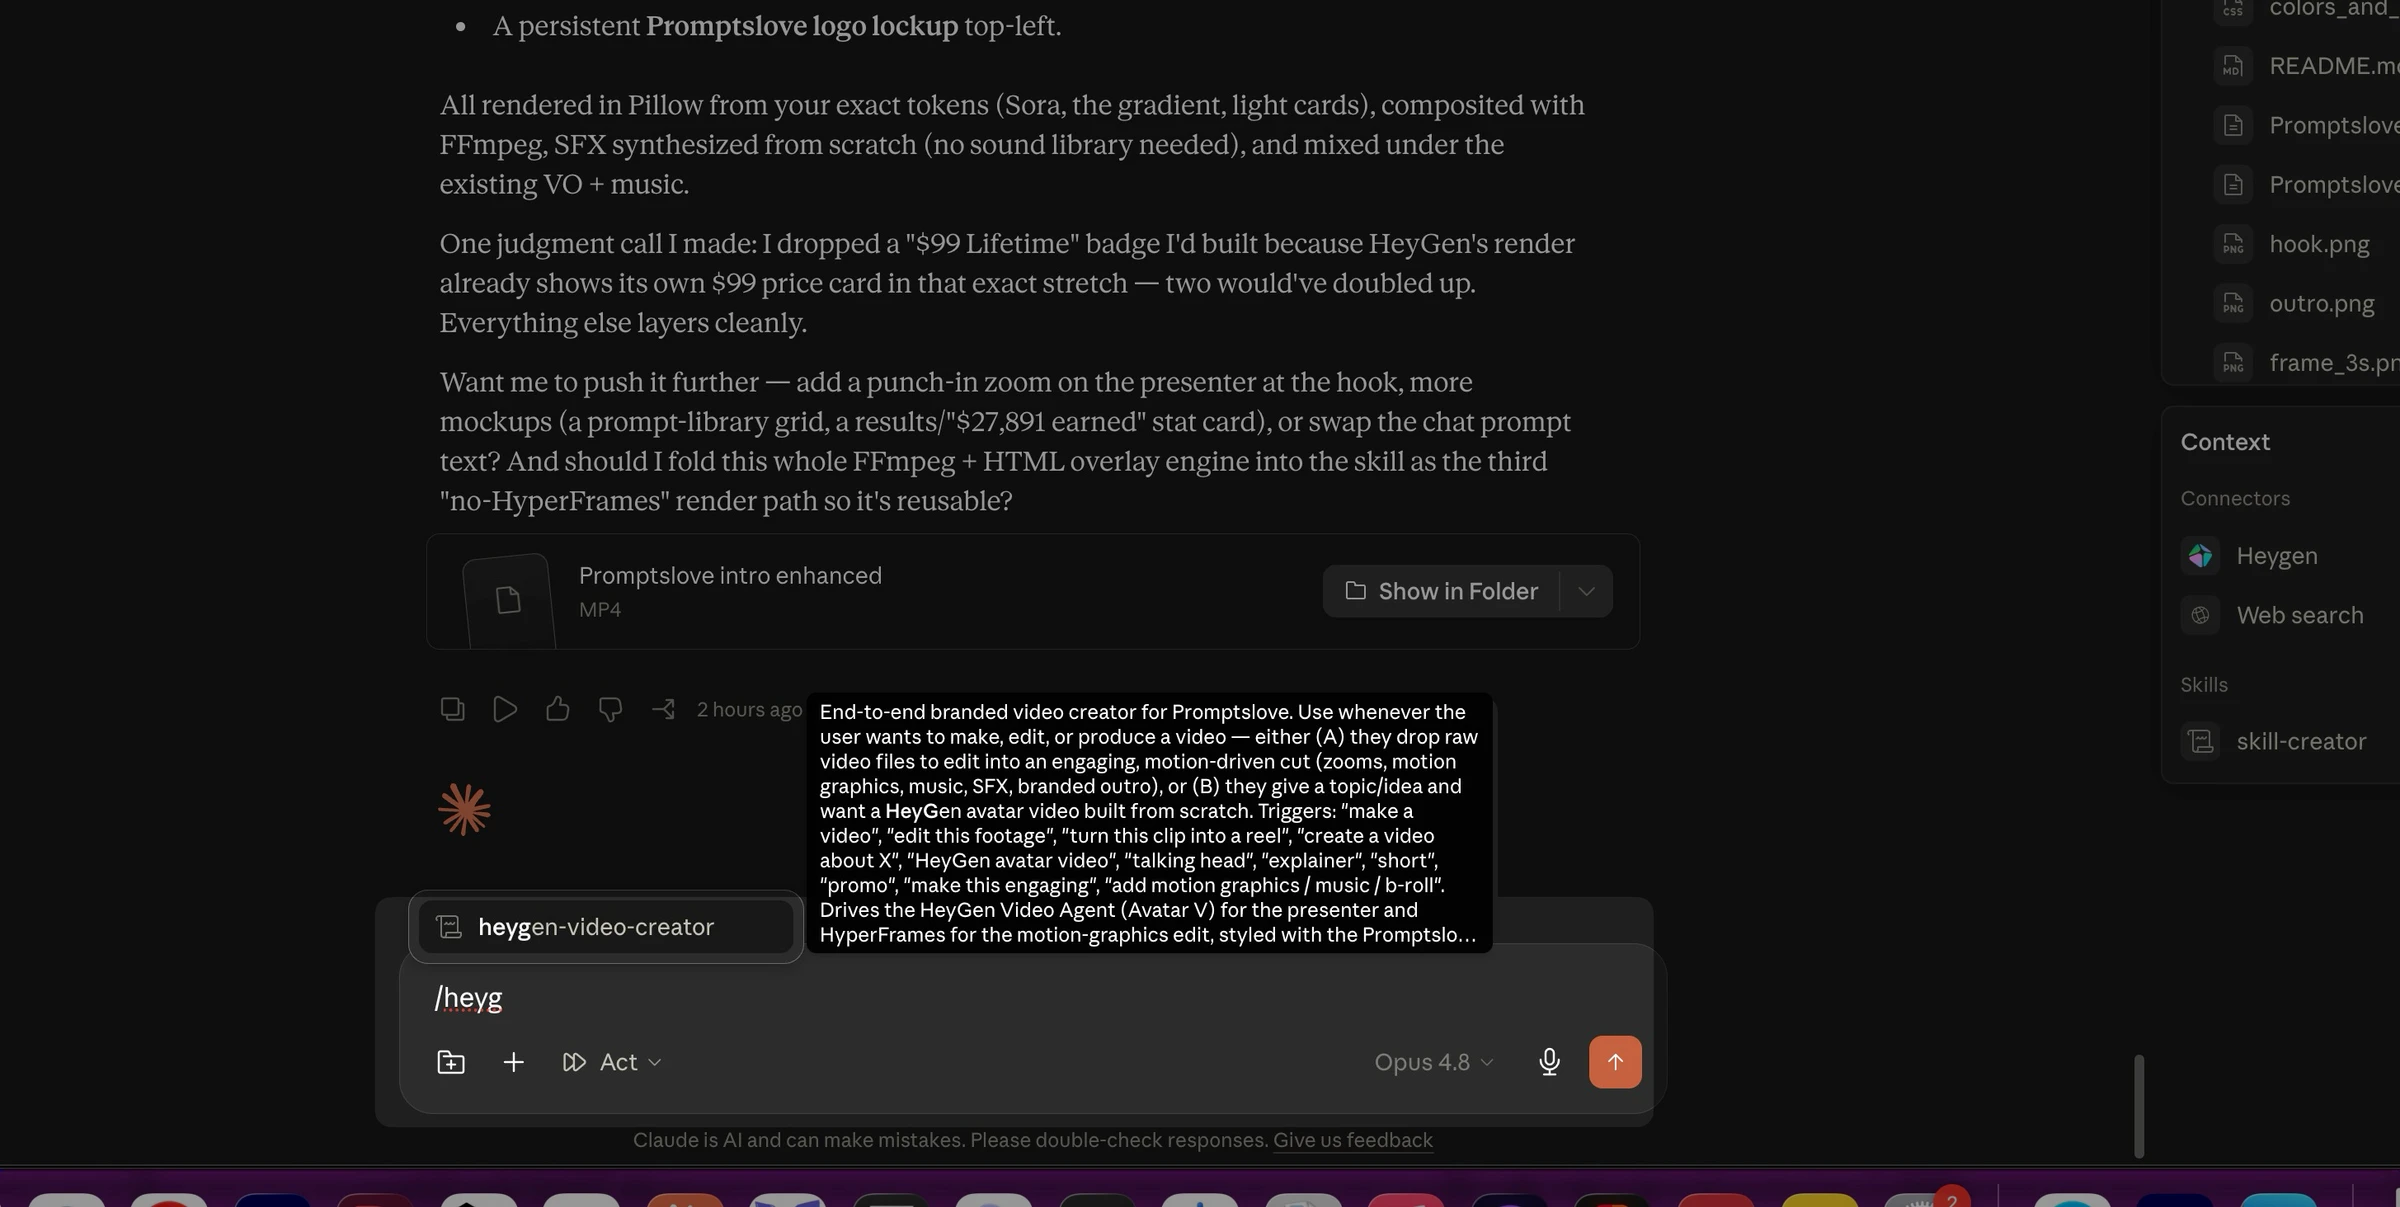
Step 3: Create Your AI Video Skill in Claude
This is where the real automation begins. Instead of writing a new prompt every time you want a video, you create a reusable skill that knows your brand and handles the full workflow.
What the Skill Prompt Does
Open Claude Code or CoWork and paste this type of prompt:
Create a skill using /skill-creator with name "Heygen-video-generator" using the Heygen MCP and HeygenHyperframes MCP.
First Analyze the following Skills in Detail - https://github.com/heygen-com/skills for Heygen and for heygen hyperframes
- https://hyperframes.heygen.com/guides/skills, and then analyze my [design.md] for brand colors, fonts and visual appeal,
Deploy multiple agent to analyze each in detail.

Here is User Flow;

User Will Drop either, URL, Topic idea and You need to first ask the user the following things
- What will be the duration of the video i.e. 1, 2 , 3 minutes or custom
- What will be the aspect ratio i.e. 9:16 or 16:9
- Select Avatar for this video.
- Dark or light version of the video.
- Your CTA
- Voice direction - energetic, calm, excited etc.

Then grab the avatar for this video and list all looks and ask which to choose.

Then next use the URL or topic idea and deploy agents to scrape the everything about it and write 3 Scroll stopping
engaging HOOKS ideas and 3 script variations. Let the user select.

Then ask the user if they want to use Hyperframes or FFMPEG + HTML to generate visuals and render the whole video
based on the design system.

Then generate all videos, add music form heygen, and sound effects, add visuals UI mockups explaining things after every
few seconds + added intuitive transitions.

Use effects like typewriter with SFX, zoom ins and zoom outs, layer system, 3d visuals, use gsap animation sync with the
user dialogues.

Render the video in 4k/
This does several things at once. It uses Claude's built-in skill creator to package the workflow as a reusable command. It reads both the HeyGen and HyperFrames MCP skill definitions so it understands how to use them correctly. It then reads your design.md file and builds an understanding of your brand identity.
For additional visual resources, you can add instructions to use:
How Multiple Agents Analyze Your Design
The prompt deploys multiple sub-agents in parallel, each focusing on a different aspect of your design system, colors, typography, visual hierarchy, and tone. This happens automatically and takes a minute or two. The result is a skill that understands your brand at a component level, not just as a list of hex codes.
Once the skill is created, make sure it's selected (highlighted in blue) in your session settings. If it's not selected, the workflow runs without your brand context.
Step 4: Run the Video Workflow
With MCPs installed and your skill created, you're ready to generate your first video. The process starts with a simple prompt.
What the System Asks You
When you invoke the video skill, it asks you a structured set of questions before starting production:
Duration: How long should the video be? Options typically range from 15 seconds to 10+ minutes.
Aspect ratio: 16:9 for YouTube and desktop, 9:16 for TikTok and Reels, 1:1 for Instagram feed.
Avatar: Which HeyGen avatar should present the video? Log in to your HeyGen account to see the avatars available on your plan. You can also use a custom avatar if you've cloned your own voice and appearance.
Dark or light version: Choose the visual theme, dark mode for a premium or tech feel, light mode for a friendly or educational tone.
CTA: What action do you want viewers to take? Examples: "Subscribe to the channel," "Visit promptslove.com," "Book a free call."
Voice direction: Specify the emotional tone of the narration, energetic, calm, authoritative, friendly, conversational, or any combination.
The Prompt-to-Video Pipeline
Once you answer those questions, invoke the skill with a prompt like:
"Use the video creator skill to make a 30-second intro video about [topic or URL]."
Here's what happens behind the scenes:
The whole process takes roughly 5-10 minutes for a 30-60 second video. Longer videos take proportionally more time.
Video #1 - Using Heygen Avatars
Video #2 - Using My Avatar Clone
HyperFrames Deep Dive: How HTML Becomes a Video
If you want to understand what's actually happening under the hood, or customize the output more precisely, this section covers HyperFrames' technical architecture.
The Basic Composition Structure
HyperFrames compositions are HTML files with specific data-* attributes that the renderer understands. A minimal video composition looks like this:
<div id="root" data-composition-id="my-video"
     data-start="0" data-width="1920" data-height="1080">

  <h1 id="title" class="clip"
      data-start="0" data-duration="5" data-track-index="0"
      style="font-size: 72px; color: white; text-align: center;
             position: absolute; top: 50%; left: 50%;
             transform: translate(-50%, -50%);">
    Your Brand Message Here
  </h1>

  <script src="https://cdn.jsdelivr.net/npm/gsap@3/dist/gsap.min.js"></script>
  <script>
    const tl = gsap.timeline({ paused: true });
    tl.from("#title", { opacity: 0, y: -50, duration: 1 }, 0);
    window.__timelines = window.__timelines || {};
    window.__timelines["my-video"] = tl;
  </script>
</div>
Three rules always apply in HyperFrames compositions:
data-composition-id, data-width, and data-heightdata-start, data-duration, data-track-index, and class="clip"{ paused: true } and registered on window.__timelinesSupported Animation Libraries
HyperFrames works with any seekable animation runtime. The supported adapters are:
The HyperFrames CLI Workflow
For manual or agent-driven rendering, the CLI process is:
npx hyperframes init my-video       # scaffold a new project
npx hyperframes preview             # preview in browser with hot reload
npx hyperframes render --output output.mp4   # render to MP4
The 50+ catalog blocks at hyperframes.heygen.com/catalog cover pre-built transitions, overlays, data visualizations, animated charts, and effects. You can drop any block into a composition without writing animation code from scratch.
For teams wanting faster production, the workflow skills add even more automation: /product-launch-video, /website-to-video, /faceless-explainer, /pr-to-video, /embedded-captions, and /motion-graphics each cover a specific video type with a pre-defined structure.
Best Practices for AI Avatar Videos With HeyGen
Getting a technically working video is step one. Getting a video that actually performs, one viewers watch, share, and act on, requires following a few tested practices.
Script and Pacing
Write scripts that deliver one clear idea per video. For social media content, keep it between 30 and 90 seconds. For YouTube or long-form, structure the content into clear beats: hook, problem, solution, CTA.
Short sentences read more naturally in AI narration. Each full stop gives the avatar a moment to reset its cadence. Write the way you'd speak in a presentation, not the way you'd write in an email.
After delivering a key message, add a 2-second pause in your script. This gives viewers time to process the information and creates a more natural rhythm.
Avatar Selection
The avatar you choose shapes the entire personality of the video. HeyGen's Avatar V (their most lifelike model) delivers realistic expressions that audiences respond to emotionally. Match the avatar style to your brand, a professional corporate avatar for B2B content, a casual presenter for lifestyle or education content.
If you want to build a true personal brand channel, clone your own avatar. HeyGen supports voice cloning and visual avatar creation. For a full tutorial on avatar cloning, the HeyGen Help Center has step-by-step guides.
Voice Direction
Voice direction controls how the narration sounds, not just what it says. Specify the emotional tone in your prompt: energetic for hype-style content, calm for educational explainers, authoritative for thought leadership. You can also combine directions, "confident but approachable."
For technical terms, acronyms, or brand names that the AI might mispronounce, use phonetic spelling in the script. For example, write "a-eye" instead of "AI" or "k-webby" for brand-specific pronunciations.
Visual Design Tips
Your design.md file handles most of the brand consistency automatically. But a few layout choices matter beyond the design system:
Keep text overlays readable. White text on dark backgrounds works reliably. Light text on light backgrounds is a common mistake that kills legibility.
Use the dark mode option for tech, SaaS, or premium brand content. Use light mode for education, health, lifestyle, or anything that should feel approachable.
For icons, point Claude to Lucide Icons in your prompt, it's a clean, consistent library that works well in HyperFrames compositions.
Prompt Engineering for Better Videos
When creating videos through the skill, the quality of your initial prompt determines the quality of the output. Claude will scrape a URL or topic and generate three hook options. Review all three before choosing, the system's second or third option is often more compelling than the first.
Add specific visual instructions to your prompt. Instead of "make a video about our product," try: "Create a 45-second product intro for [product name] using a dark theme, energetic voice direction, with a subscribe CTA at the end. Target audience: SaaS founders. Add animated data visualizations and use Lucide icons for feature bullets."
The more context you give, the less iteration you need afterward. Good prompts reduce production cycles from three rounds to one.
Real Use Cases: Who Gets the Most Out of This Pipeline
YouTube Content Creators
The pipeline was built with creators in mind. You give it a topic or a URL, and it produces a ready-to-upload video, scripted, narrated, branded, and edited. For channels covering AI tools, software reviews, or tutorial content, this pipeline can replace a video editor, scriptwriter, and voiceover artist.
Use the clone avatar feature to keep a consistent personal brand face across every video. Your audience sees you in every upload, even when the actual production was automated.
Brand and Marketing Teams
Marketing teams use the HeyGen MCP + HyperFrames pipeline to produce social media clips, product announcements, and campaign videos at scale. Instead of scheduling a video shoot, you brief Claude in a chat and get a brandconsistent video in under 10 minutes.
The design.md file ensures every video matches your visual identity. No brand review required.
Educators and Course Creators
E-learning video production traditionally takes weeks per module. The pipeline cuts that to hours. You feed Claude the content, specify the duration and structure, and the system produces a narrated explainer video complete with animated overlays and visual examples.
HeyGen's translation feature can then re-render the same video in 140+ languages using AI dubbing and lip-sync, making localization nearly automatic.
Agencies and Freelancers
For agencies, this pipeline is a production multiplier. One operator can manage multiple client video projects simultaneously, using each client's design.md file to maintain brand separation. The HyperFrames catalog of 50+ blocks means you're not starting from scratch for every creative.
HeyGen MCP Skills: The Optional Upgrade for Better Output
HeyGen offers a skills library on GitHub at github.com/heygen-com/skills that teaches Claude structured prompt patterns for video production. Before generating a video via Claude Code, you can load these skills with:
Before writing any video prompts, read the HeyGen skills at:
https://github.com/heygen-com/skills

Follow SKILL.md, references/prompt-optimizer.md, and references/video-agent.md
to structure each prompt with scenes, timing, visual style, and copy rules.
These skills encode HeyGen-specific patterns around scene structure, timing rules, visual style guidance, and copy standards. Using them gives you noticeably better first-draft quality, especially for longer or more complex videos.
The MCP page for Claude integration is at heygen.com/integrations/claude and the full developer documentation is at developers.heygen.com.
Credit and Cost Considerations
HyperFrames uses more HeyGen credits than the FFMPEG alternative because it runs additional rendering passes for graphics, transitions, and effects. If you're producing videos at high volume, the cost difference matters.
A practical approach: use HyperFrames for hero content, YouTube uploads, client-facing deliverables, and social media posts that represent your brand publicly. Use the FFMPEG + HTML system for internal communications, drafts, A/B test variations, and high-volume content where individual video quality is secondary to output speed.
HeyGen's pricing is available at heygen.com/pricing. Credit costs vary by video length, avatar type, and resolution.
Frequently Asked Questions (FAQs)
What is HeyGen MCP and how does it connect to Claude?
HeyGen MCP uses the Model Context Protocol to give Claude direct access to HeyGen's video generation engine. You add the MCP server URL (https://mcp.heygen.com/mcp/v1/) as a custom connector in Claude Desktop or configure it in Claude Code using the claude mcp add command. Authentication uses OAuth, no API keys needed. Once connected, Claude can generate videos, manage projects, and trigger translations through simple prompts.
Do I need a paid HeyGen account to use this pipeline?
A free HeyGen account works for testing, but regular video production requires a paid plan. Video credits are consumed each time you generate a video, and HyperFrames rendering uses additional credits on top of the base video generation. Check current plan details and credit allocations at heygen.com/pricing before committing to a production workflow.
What is HyperFrames and how is it different from traditional video editing?
HyperFrames is HeyGen's open-source framework that converts HTML compositions into MP4 video files. Instead of using a timeline editor, you write HTML, CSS, and GSAP animations. AI coding agents can generate and edit these compositions from prompts. The rendering is deterministic, the same composition always produces the same video, which makes it reliable for automated pipelines. See the full docs at hyperframes.heygen.com.
Can I use my own face and voice as the video avatar?
Yes. HeyGen supports custom avatar creation using your own video footage and voice recordings. Once you've created a personal avatar, you reference it in your prompts by its avatar ID. For a detailed guide on creating and cloning your avatar, visit the HeyGen Help Center. HeyGen's Avatar V model is their most realistic avatar to date, available on paid plans.
What does the design.md file do and do I need one?
The design.md file contains your brand identity: colors, fonts, typography scale, logo usage, and visual style notes. Claude reads this file before generating the video and uses the brand information to style graphics, overlays, and motion elements to match your branding. Without it, the pipeline uses default styling. You can generate a design.md in minutes from your website using Google's free Stitch tool at stitch.withgoogle.com.
How long does it take to produce a video with this pipeline?
A 30-60 second video takes roughly 5-10 minutes from prompt to finished MP4, once the pipeline is configured. Longer videos scale proportionally, a 3-minute video typically takes 20-30 minutes to render. First-time setup (MCP installation, design system creation, skill building) takes about 30-45 minutes. After that, individual video production is fully automated. Compare that to traditional video production, which averages 1-2 weeks for a professional-quality result.
Final Thoughts
The HeyGen MCP + HyperFrames pipeline is the most complete AI video production system I've seen built into a chat-based workflow. It solves the entire chain: research, scripting, narration, avatar selection, motion graphics, music, SFX, and final render, all from a single prompt inside Claude.
The setup takes under an hour. The design system ensures brand consistency across every video. The skill you create becomes a reusable production tool you can use every day without re-configuring anything.
Start with a 30-second test video using your website URL as the input. Pick one of the three hooks Claude suggests, let HyperFrames render it, and see what the pipeline produces before committing to a full production workflow. That first video will tell you more than any tutorial.
Install the HeyGen MCP at heygen.com/model-context-protocol, set up HyperFrames at hyperframes.heygen.com/quickstart, and build your design system at stitch.withgoogle.com. The pipeline is ready when you are.