After years of designing in Figma and animating in After Effects, I finally got what I've been asking for. Figma Motion launched at Config 2026 on June 24, and it puts a timeline directly on your canvas. Keyframes, easing curves, animated components, and an AI agent that builds animations from plain English, all without leaving the file where you designed everything.
I spent the past week inside the beta. I tested preset animations, built motion variables, handed off code to developers, and ran dozens of AI agent prompts to see what actually works. This is the complete guide I wish existed when I started.
You'll learn how every feature works, which AI agent prompts get results, and how to go from design to production-ready animated code without switching tools.
Key Takeaways
What Is Figma Motion and Why Does It Matter in 2026
The Old Workflow Was Broken
If you've worked on a product team for more than a year, you already know the pain. You design in Figma. You hand it off to a motion designer. They rebuild it in After Effects. They export a Lottie file. A developer imports the Lottie file. The easing looks slightly wrong. Someone screenshots the After Effects timeline and sends it in a Slack message. The developer guesses.
This isn't an edge case. This is the standard motion handoff for most product teams in 2025. A 2025 survey by Figma found that motion was consistently one of the top three friction points in design-to-development handoffs. Teams were spending hours per sprint just translating animation intent from one tool to another.
I was part of this cycle. My team used Figma for design and Rive for complex animations. For simpler interactions, we used CSS transitions described in comments. For marketing assets, After Effects. We had three different motion tools and no single source of truth.
Figma Motion Changes Everything
Figma Motion puts the timeline in the same file as your components, variables, and collaborators. When you switch a frame to Motion mode, a timeline appears at the bottom of the screen. That's it. No plugin to install, no new file format, no external tool. Read the full announcement on the Figma blog.
Atlassian's Senior Product Designer Alexandra Pereira described it well: "It turns animated illustrations from a specialist handoff into a system capability."
That's the shift. Motion stops being a finishing step done by one specialist. It becomes part of the system, the same way color tokens and component variants are part of the system. Every designer on your team can contribute to it, inspect it, and comment on it directly on the timeline.
For me personally, the biggest change is that I no longer need to describe animation to developers in Slack. I build it in Figma, switch to Dev Mode, and they copy the CSS. That's the entire workflow.
Getting Started with Figma Motion
How to Access Figma Motion
Figma Motion is in open beta as of June 2026. You can access it on any plan as long as you have "can edit" access to the file. Starter plan users get access to motion with limited export capabilities. Full seat users on any paid plan get access to motion primitives, all export formats, and full design system integration. The AI agent for motion requires a paid plan. Head directly to figma.com/motion to get started.
To open Figma Motion, open any Figma design file and look for the mode toggle in the toolbar at the top of the screen. You'll see options for Design, Draw, and Motion. Click Motion and the timeline panel opens at the bottom of your canvas.
You can also switch specific frames to Motion mode by selecting a frame and clicking the Motion icon that appears in the right sidebar.
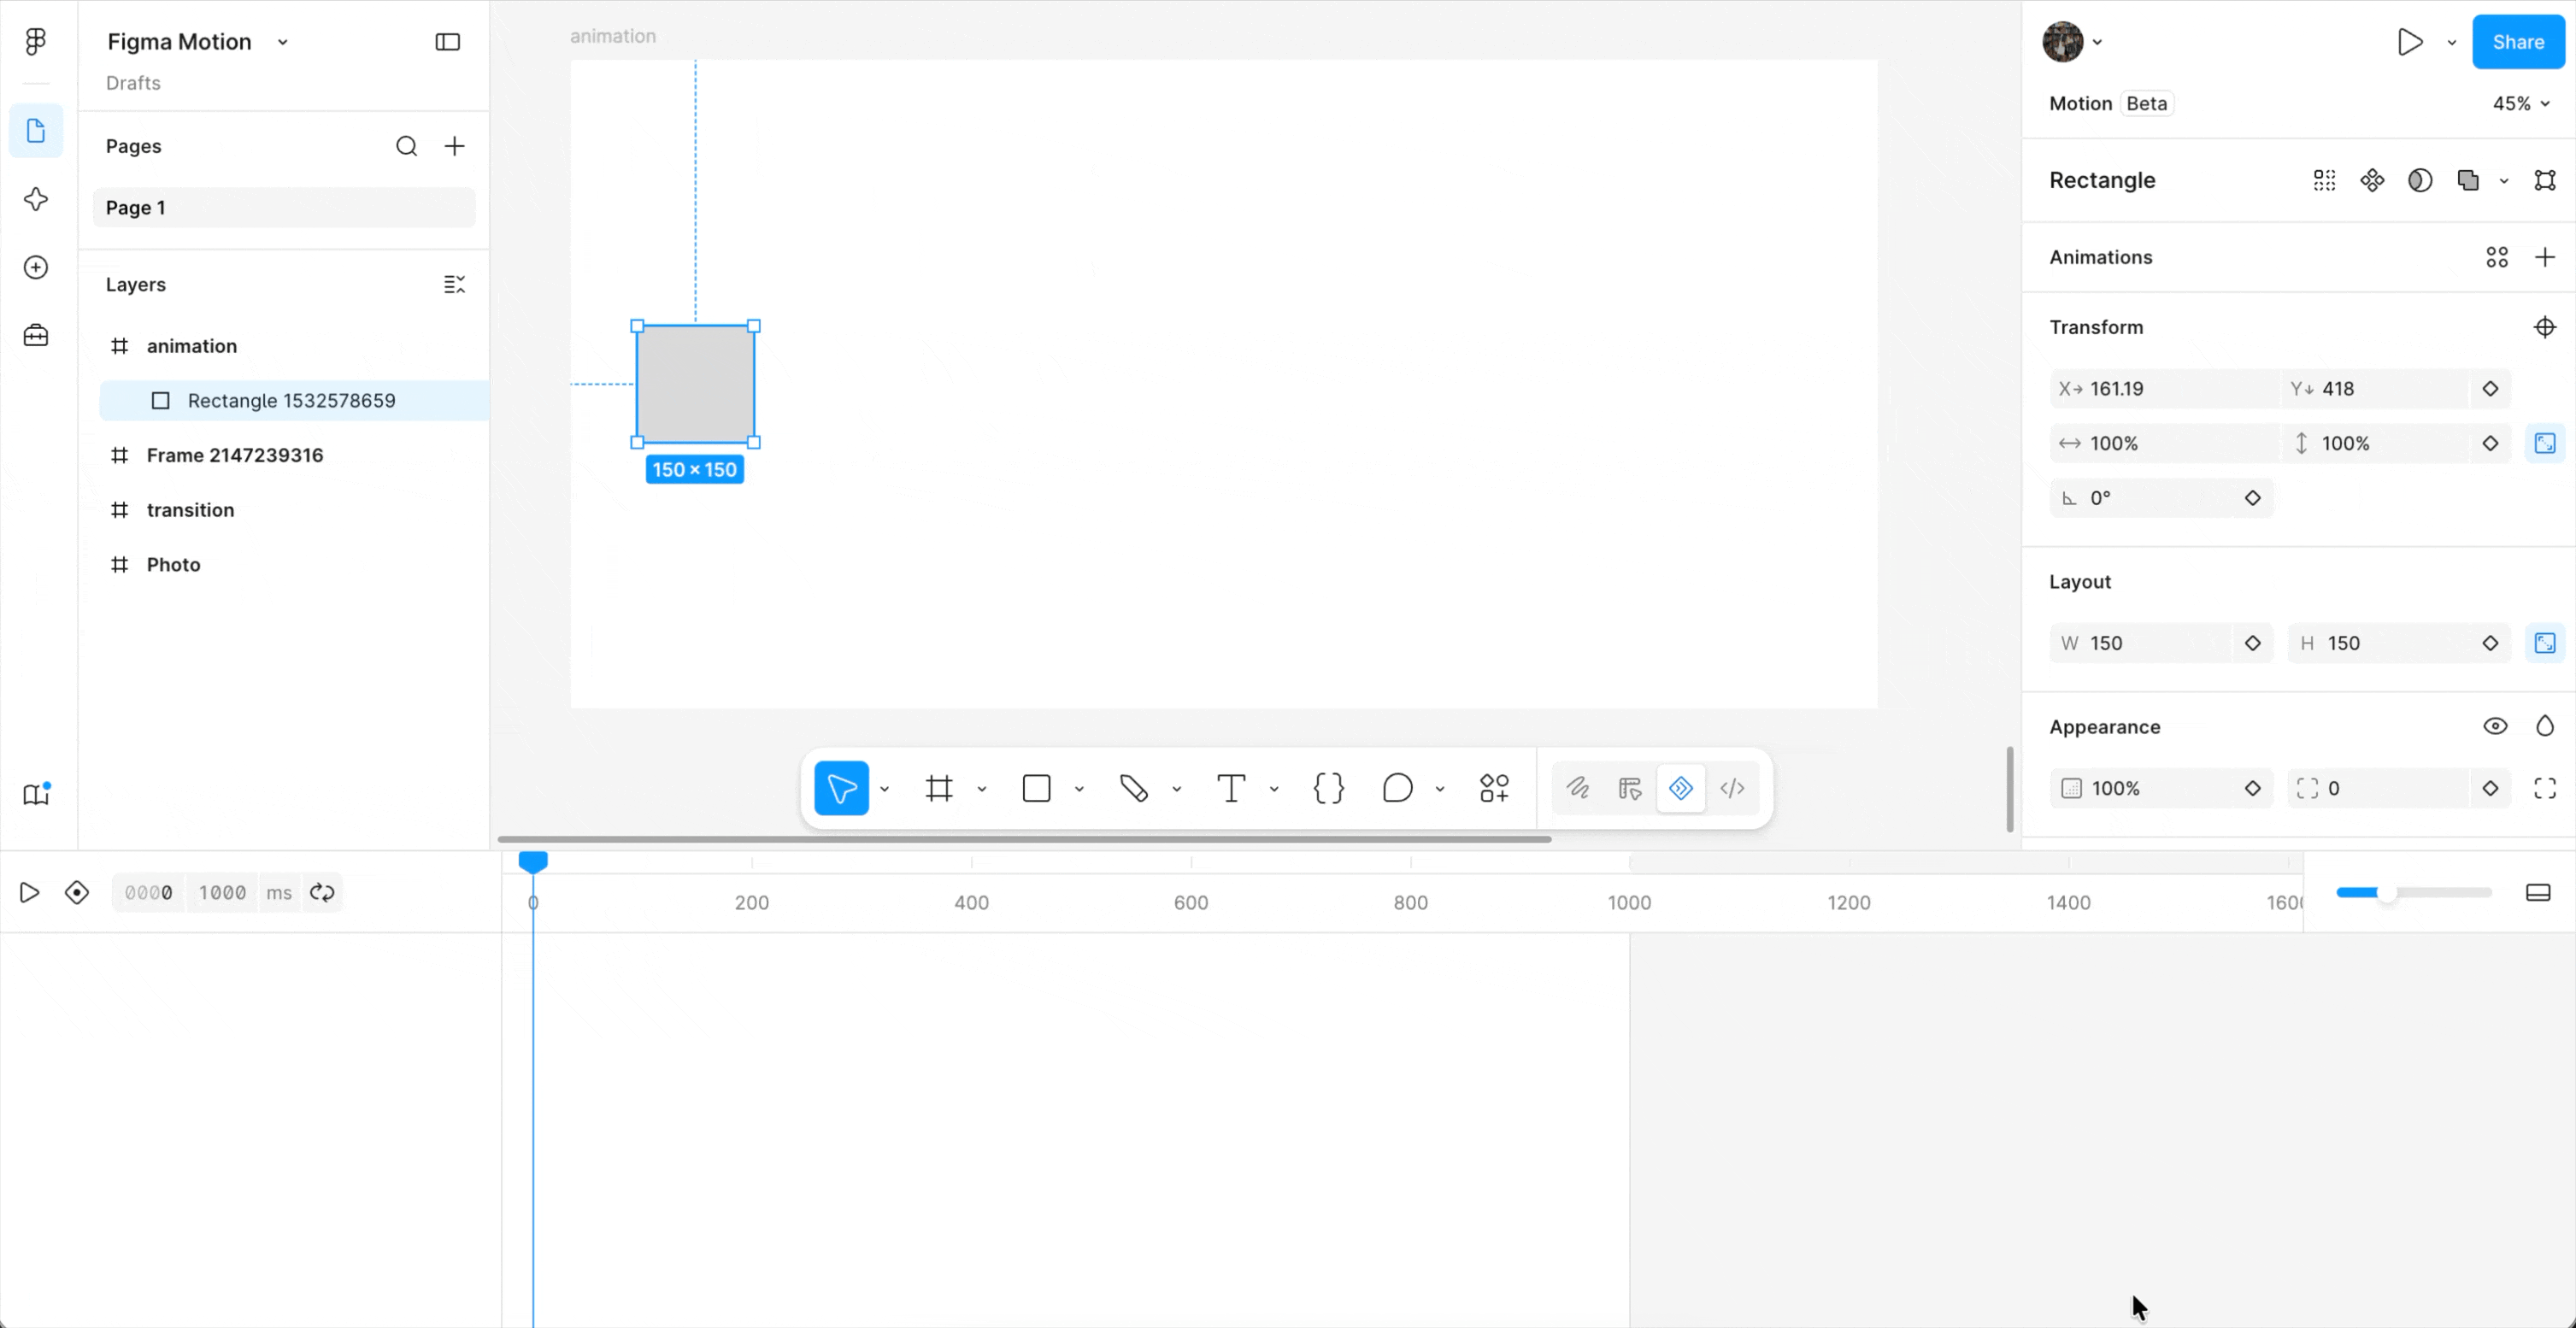
The Timeline Interface
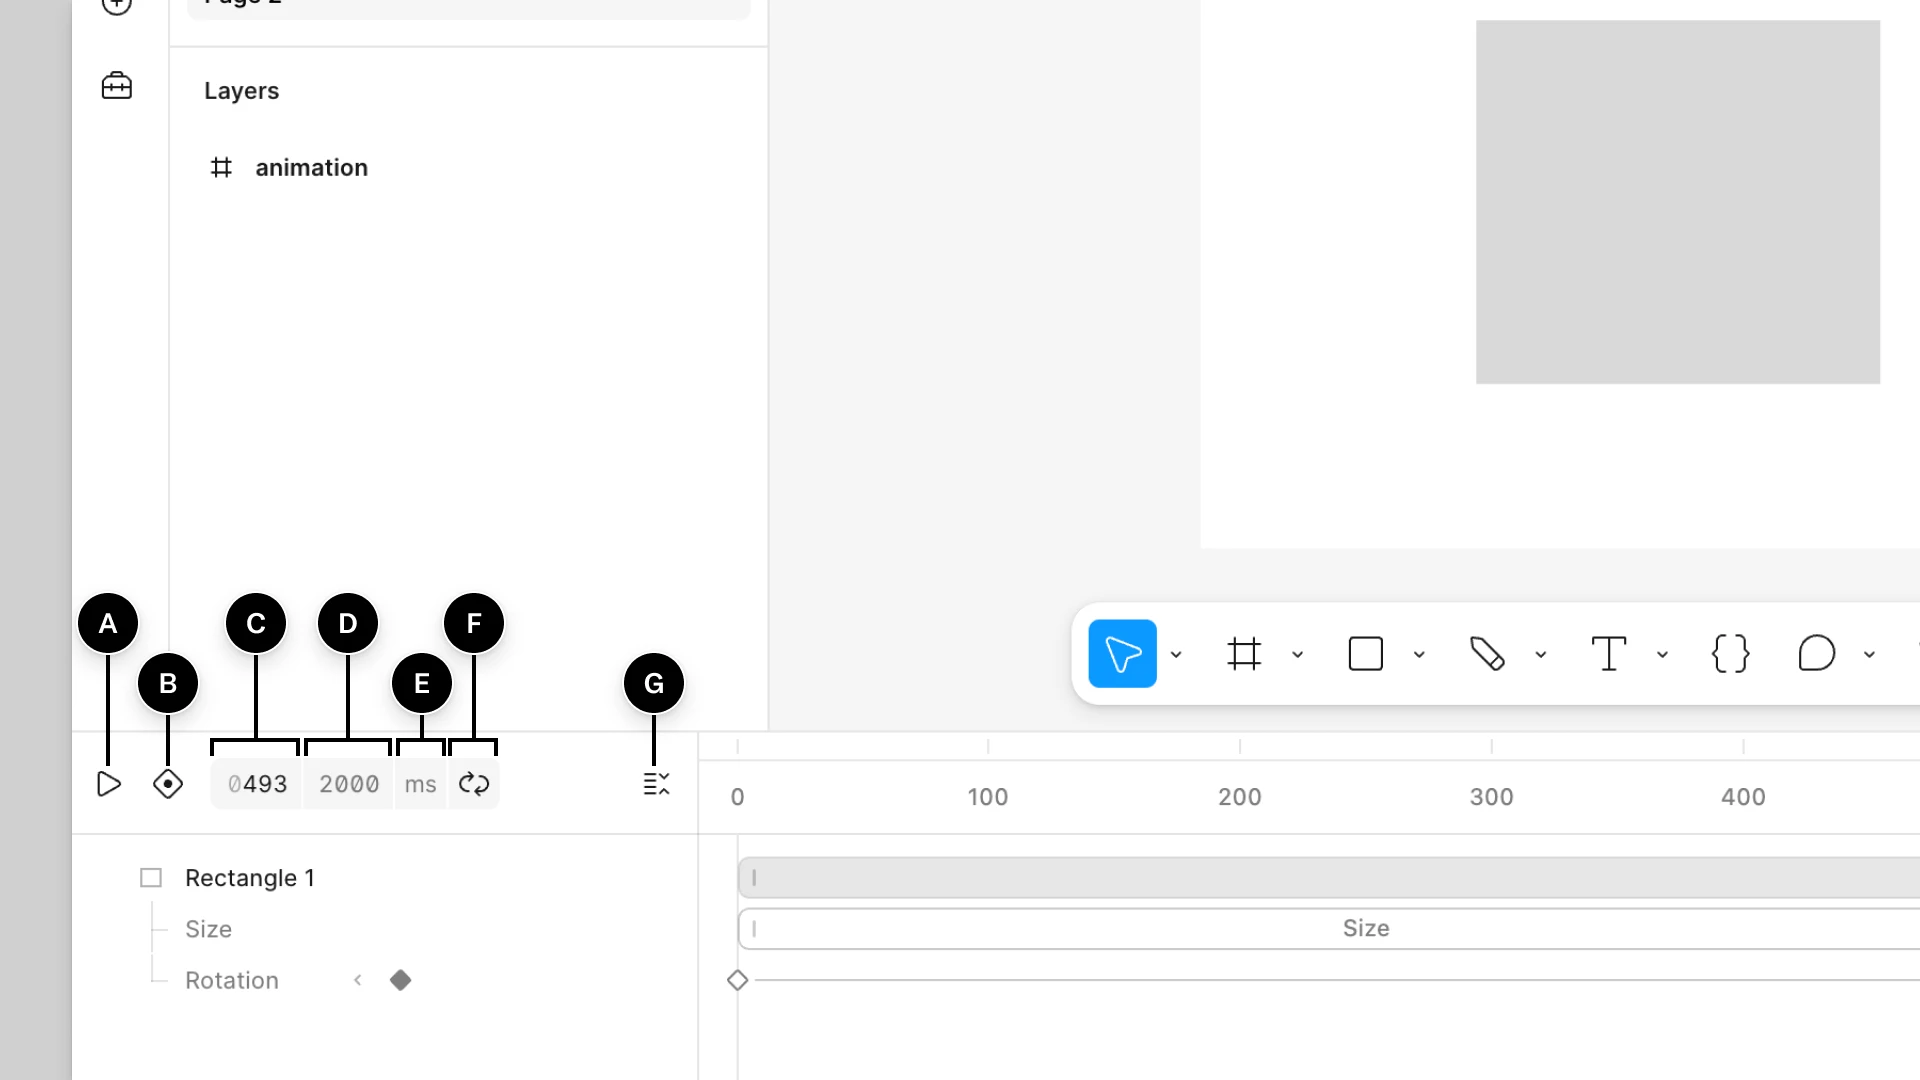
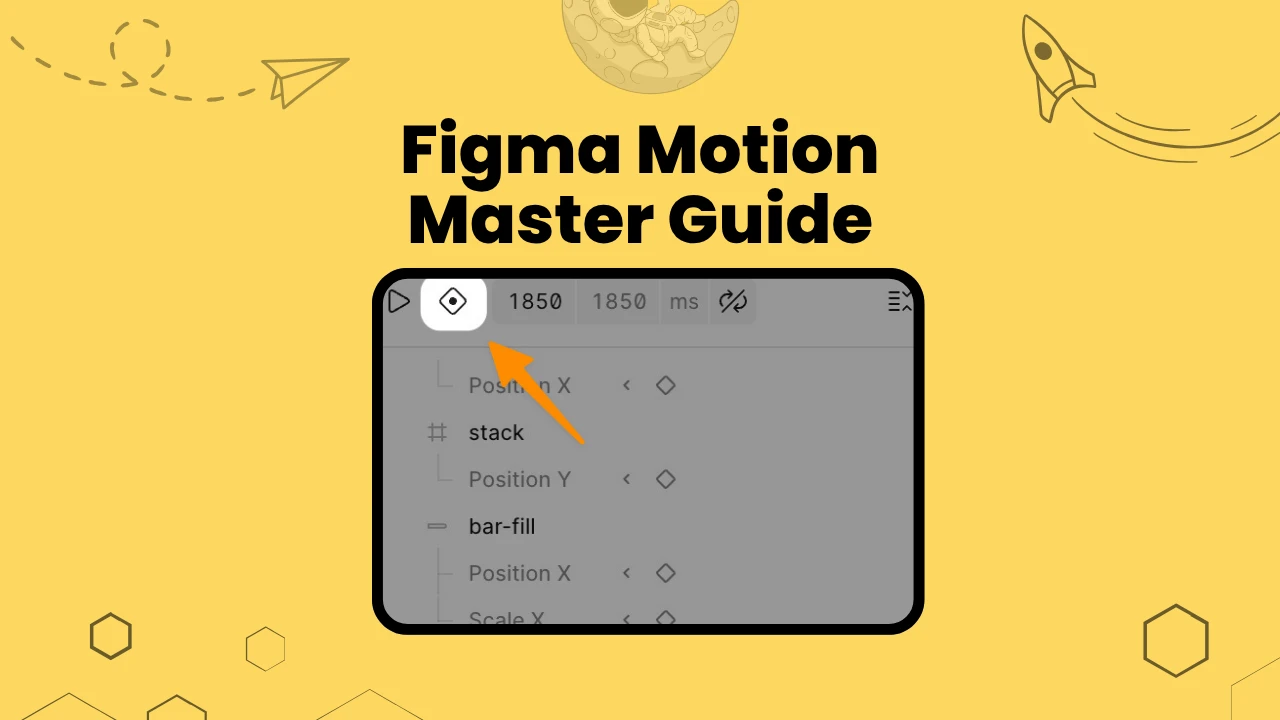
The timeline panel gives you seven controls. Once you know what each one does, the whole interface clicks into place.
A. Play / Pause — Click the Play button or press Spacebar to preview your animation at full speed. Press Spacebar again to stop. I use this constantly while building, playing back after every two or three keyframe changes to catch anything that feels off before I go deeper.
B. Auto-Keyframe — Turn this on and Figma records a keyframe every time you change a property. Move a layer, adjust opacity, resize, and it's captured automatically at the playhead position. It's the fastest way to rough in a complex animation. One warning: every change counts, including accidental ones. Switch it off the moment you're done recording.
C. Current Time — This field shows exactly where the playhead sits on the timeline. You can click it and type a value to jump to a specific moment instantly. I use this when I need to land two keyframes from different layers at precisely the same millisecond.
D. Duration — This is the total length of your animation. Click the field and type a new value to make your animation longer or shorter. If you extend the duration, your existing keyframes stay exactly where they are. Only the available canvas grows.
E. Time Unit — Click here to toggle the timeline display between seconds and milliseconds. I default to milliseconds for UI work since most micro-interactions live in the 150ms to 500ms range. I switch to seconds for longer marketing animations where millisecond precision matters less.
F. Playback — This controls what happens when the animation finishes. Click to cycle through three modes: Once (plays through and stops), Loop (restarts continuously), and Ping-pong (plays forward then reverses). Ping-pong is great for hover state previews where you want to see the enter and exit back to back.
G. Collapse Layers — Click this to collapse or expand every layer track on the timeline at once. Collapse when you need a high-level view of a long sequence. Expand when you're working in a nested component and need to see individual property tracks.
The Three Ways to Add Animation
1. Preset Animations: Fastest Path
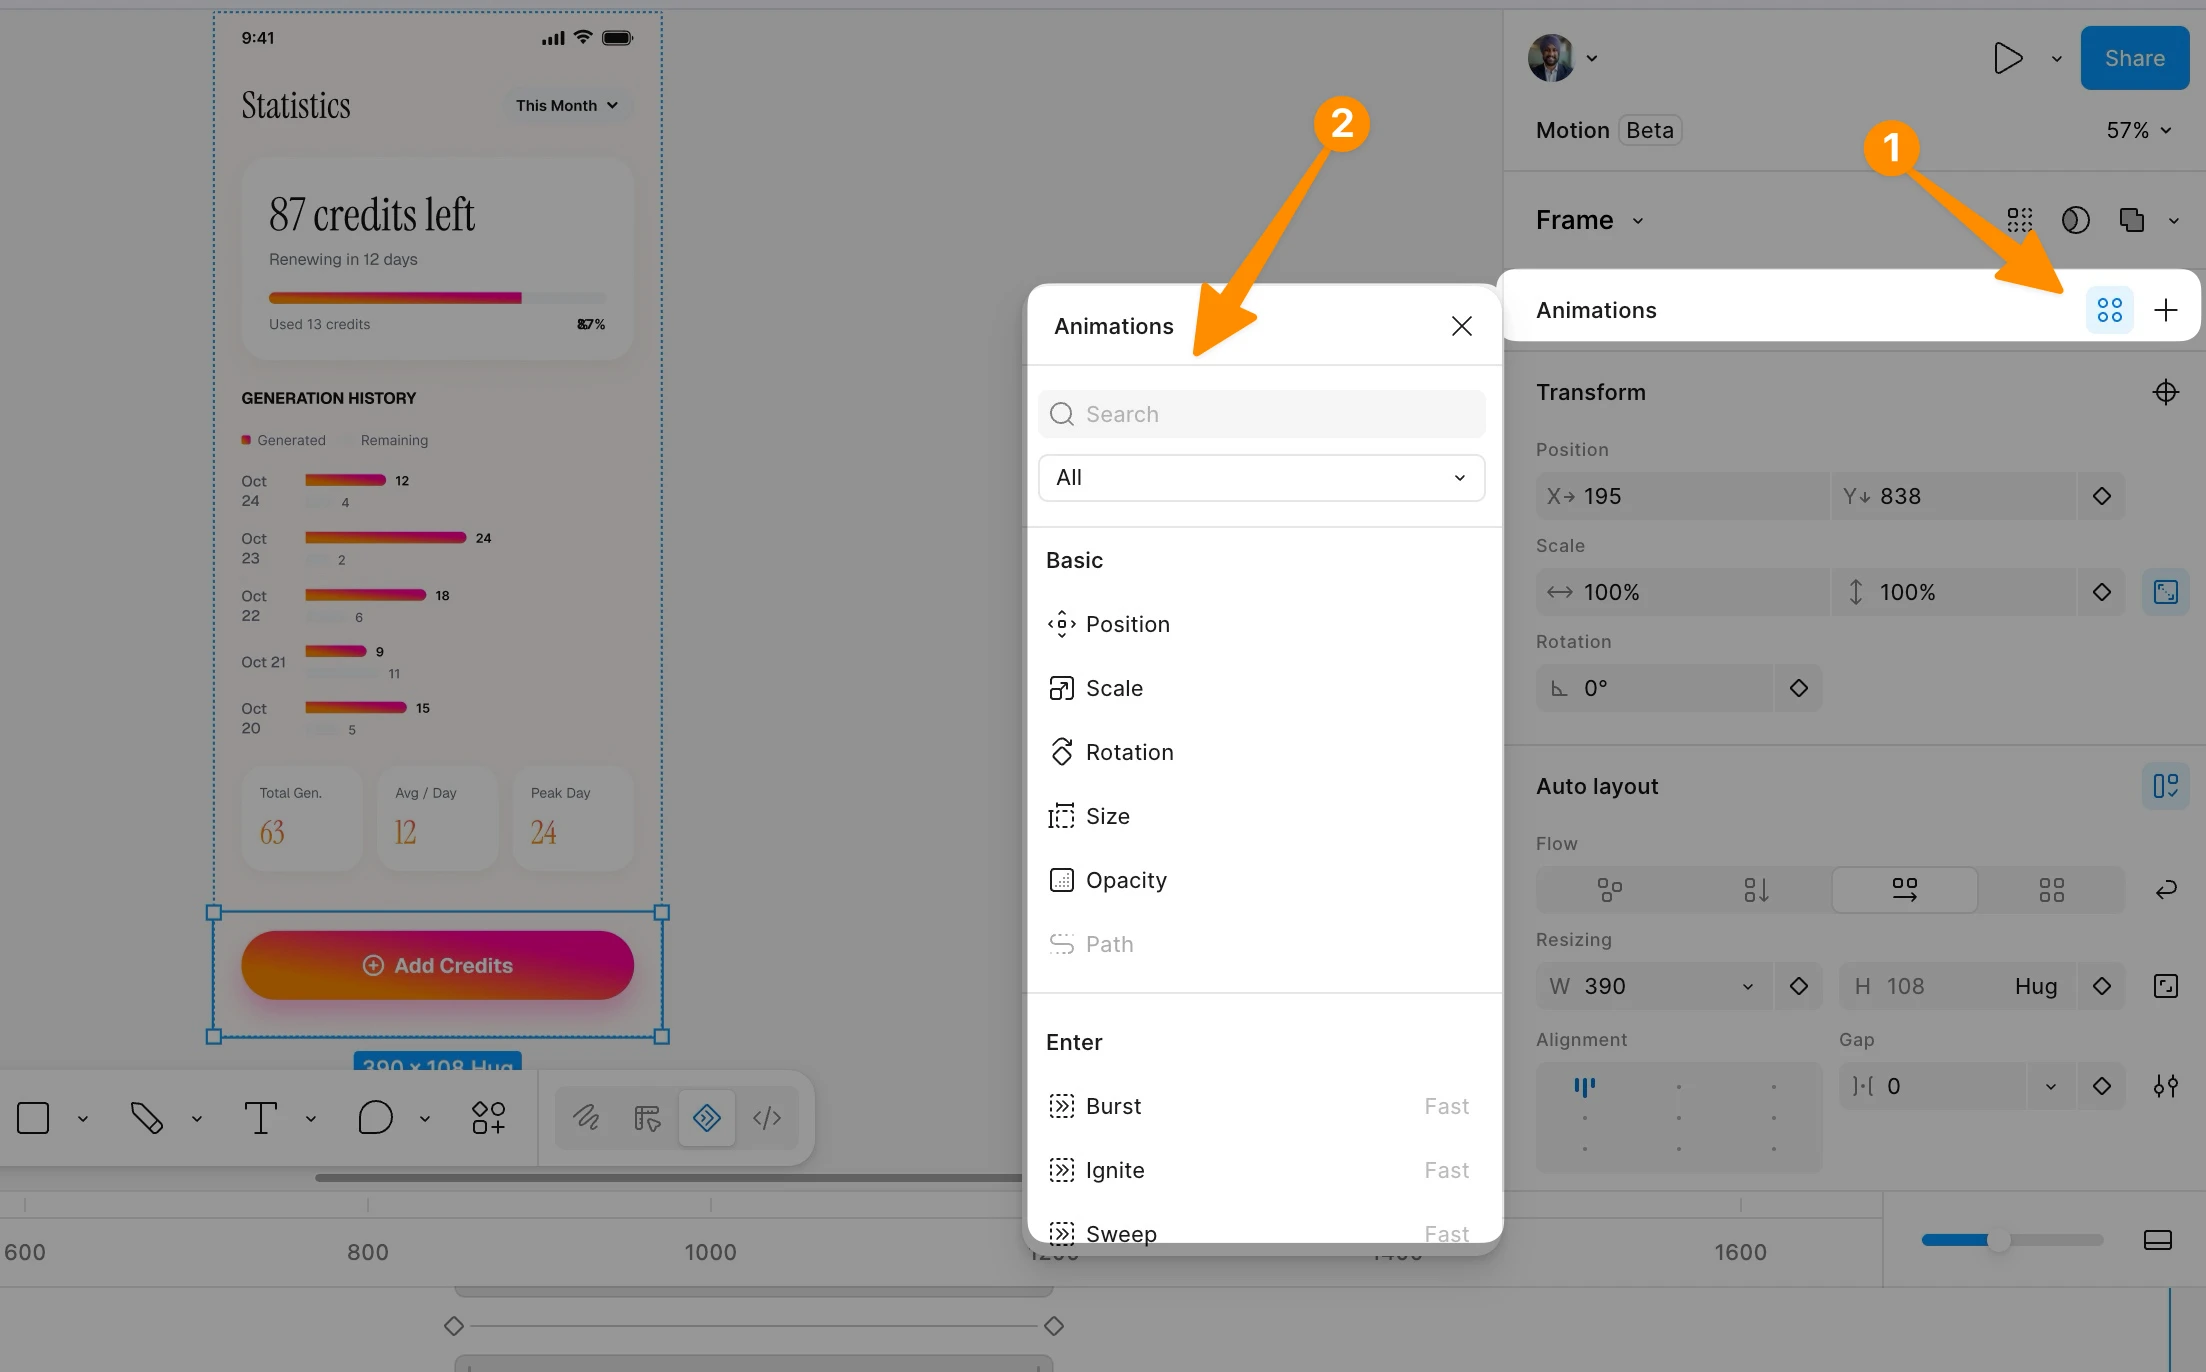
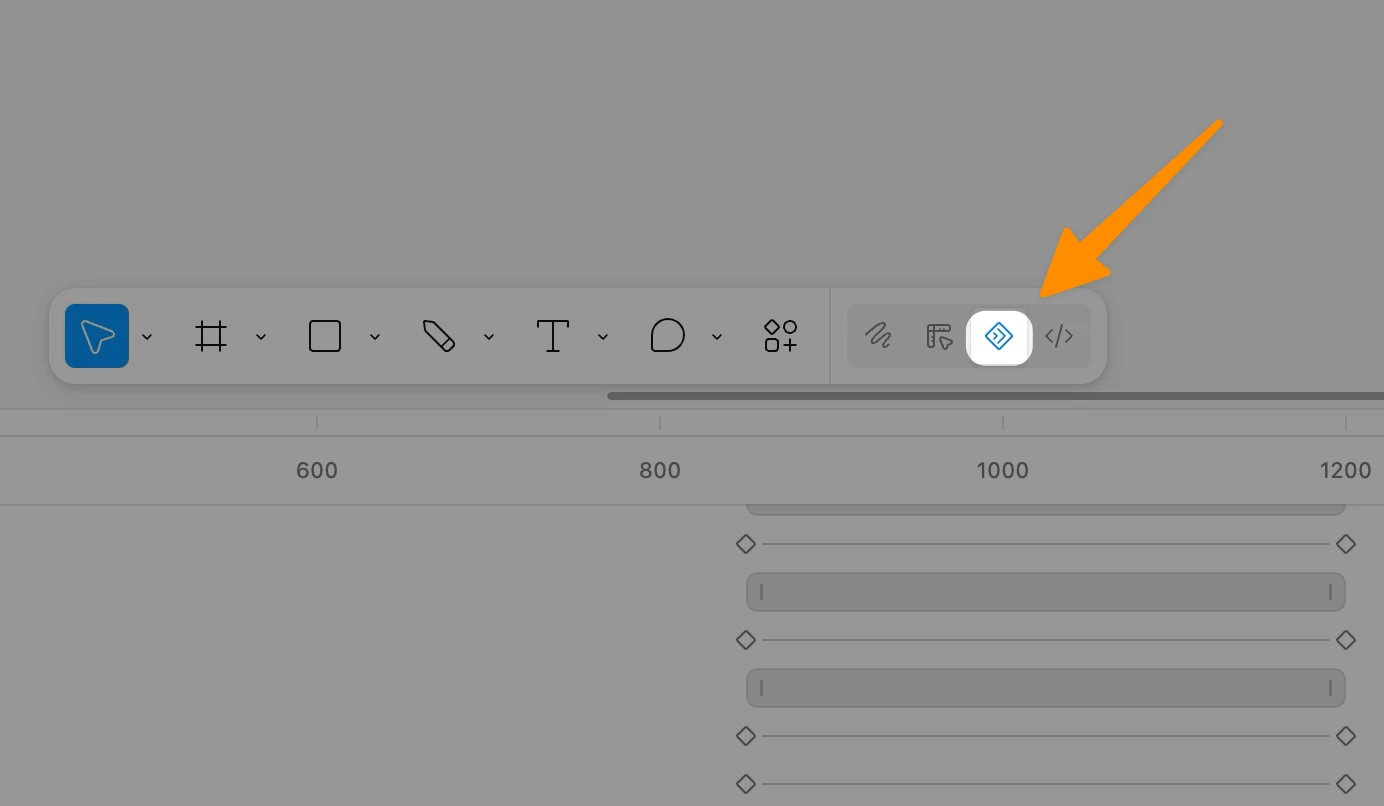
Preset animations are pre-configured motion effects you can apply in one click. They appear in the Animations section of the right sidebar when you're in Motion mode. Full docs here.
To apply a preset, select one or more layers, click the plus icon in the Animations section, and choose an animation type from the menu. Available presets include fade, move, scale, and combinations of these. Each preset has its own settings, for a Move animation, you set the direction and distance; for a Fade, you set the start and end opacity values.
Once applied, the preset appears as a block on the timeline starting at the current playhead position. You drag it to move it in time, and drag its handles to change its duration. You can stack multiple presets on the same layer to create layered effects that play simultaneously or in sequence.
I use presets for two situations: when I'm quickly communicating an animation idea to a client and don't need precise control, and when I need to rough in 10 or more identical animations across a design before refining each one. For anything production-ready, I switch to keyframes.
2. Manual Keyframes: Full Control
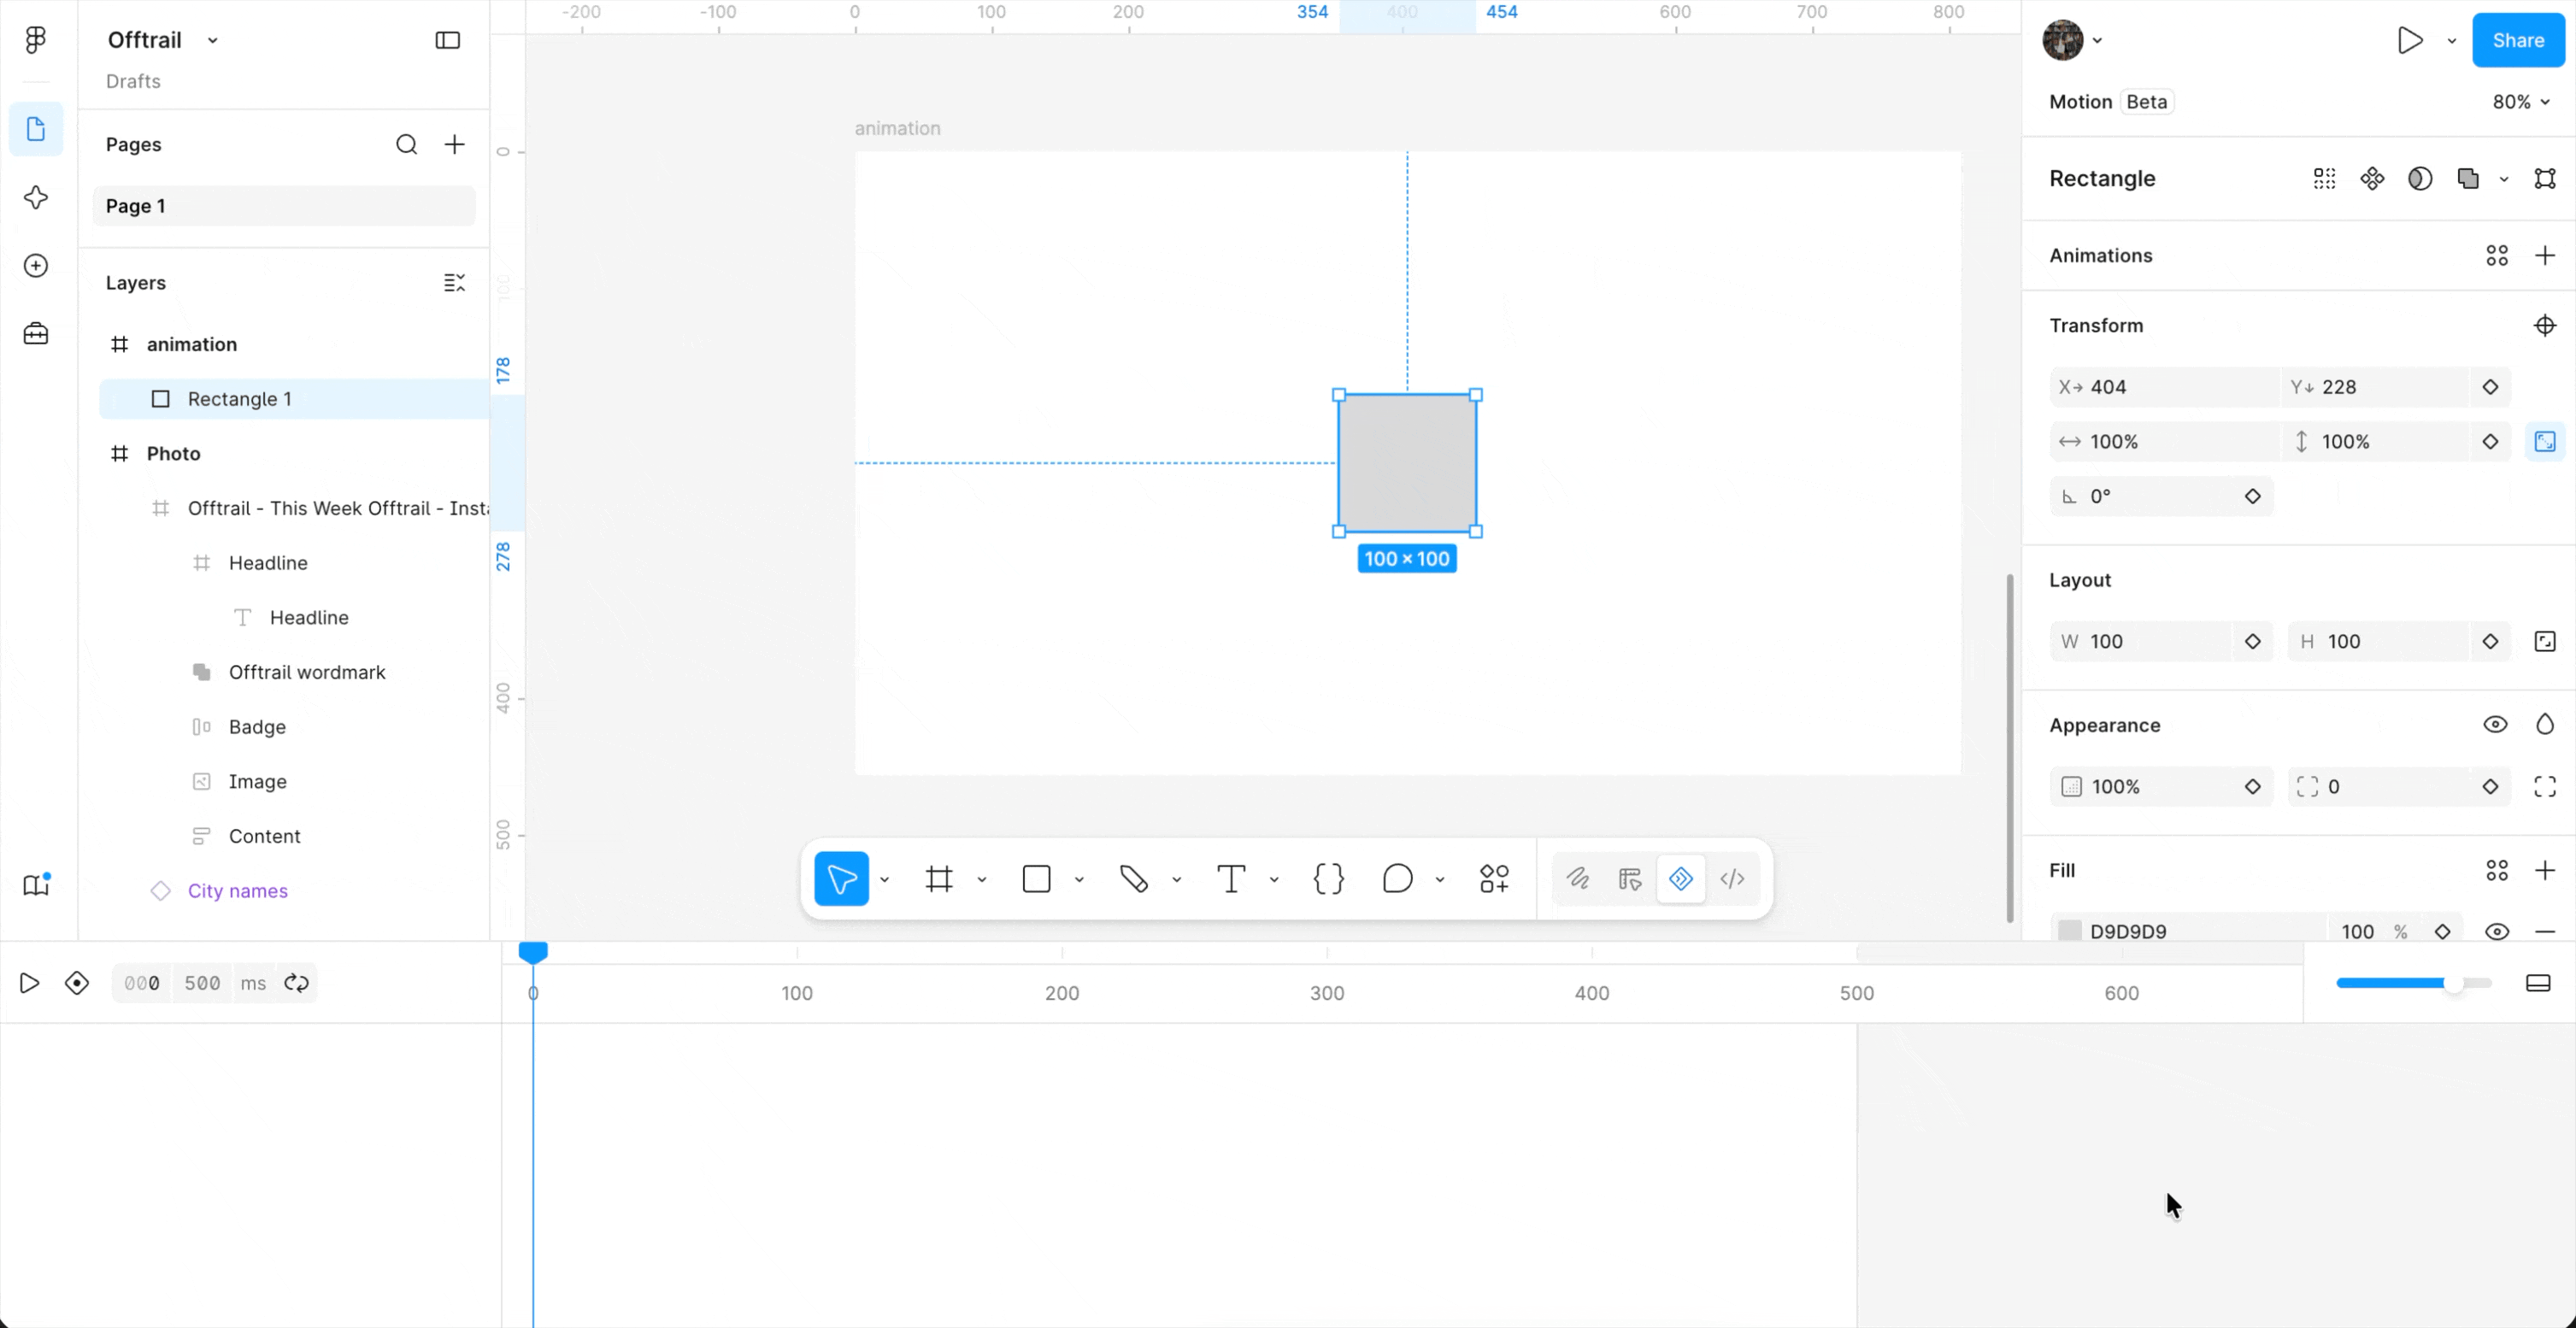
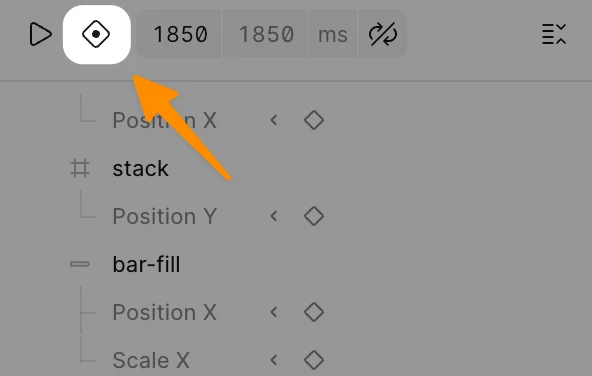
Manual keyframes give you precise control over every moment in the animation. See Figma's keyframes documentation for the full reference. Any property that supports keyframing shows a small diamond icon next to its field in the right sidebar. You'll see this for position (X and Y), scale, rotation, opacity, and anchor point.
Here's the exact workflow for creating a manual keyframe animation:
You can select that connecting line and change the easing curve, which I'll cover in the next section. Continue adding keyframes to build complex motion sequences.
One workflow I love: keyframing multiple properties with offset timing to create staggered effects. I'll set a fade-in from 0ms to 200ms, then position animation from 100ms to 300ms. The 100ms overlap creates a natural feeling where the element starts appearing before it finishes moving.
3. Auto-Keyframe Mode: Recording Mode
Auto-keyframe is Figma's recording mode. When enabled, you work with your design like normal, adjust position, resize, change opacity, and every change gets captured as a keyframe at the current playhead position.
To use it effectively, work through your animation in chronological order. Move the playhead to 0ms, set your initial state, then scrub to 300ms and adjust the element to its end state. Figma records a keyframe at each position where you make a change.
The red bar at the top of the timeline when auto-keyframe is active is a visual warning. I've made the mistake of forgetting it was on, making a design adjustment, and creating an unintended keyframe. Always disable auto-keyframe when you're not actively recording.
Auto-keyframe works exceptionally well for complex multi-property animations where you want to see the full picture as you work rather than setting keyframes property by property.
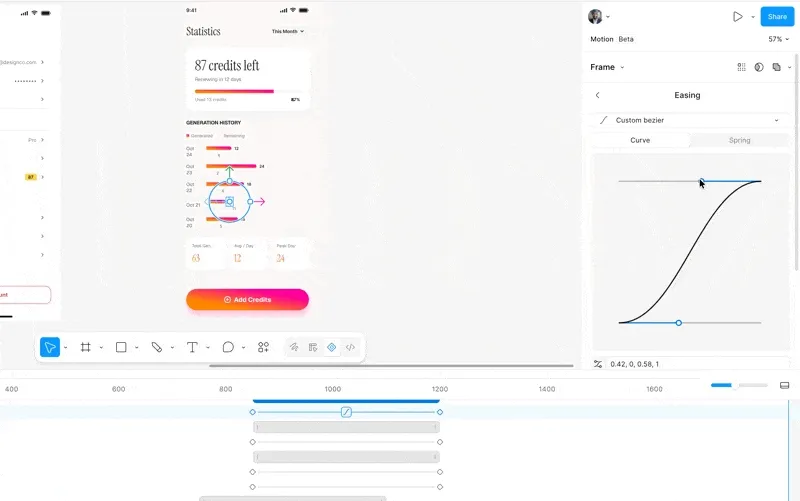
Easing Curves: The Secret to Good Motion
Bézier Curves in Figma Motion

Easing curves control how an animation accelerates and decelerates between keyframes. Figma's official easing documentation covers all curve types in detail. Without easing, animations look robotic. With the right easing, they feel natural and intentional.
Figma Motion includes eight Bézier curve presets:
Linear: Constant speed from start to end. Use this for mechanical or data-driven animations where uniformity matters.
Ease In: Starts slow and accelerates. Use this for elements leaving the screen (the acceleration reinforces departure).
Ease Out: Starts fast and decelerates. Use this for elements entering the screen (deceleration feels like a natural arrival).
Ease In/Out: Slow start, fast middle, slow end. The default for most UI animations. Creates smooth, polished motion that feels intentional.
Ease In Back: Anticipates before moving forward. The element dips slightly backward before accelerating forward. Use sparingly for playful, bouncy effects.
Ease Out Back: Overshoots the target slightly before settling. Creates a satisfying snap-into-place feeling. I use this for modal entrances and notification popups.
Ease In/Out Back: Combines anticipation and overshoot. Only appropriate for large, expressive animations where you want maximum personality.
Hold: Jumps instantly to the end value with no interpolation. Use this for state changes that should be immediate, like toggling visibility.
Spring Animations
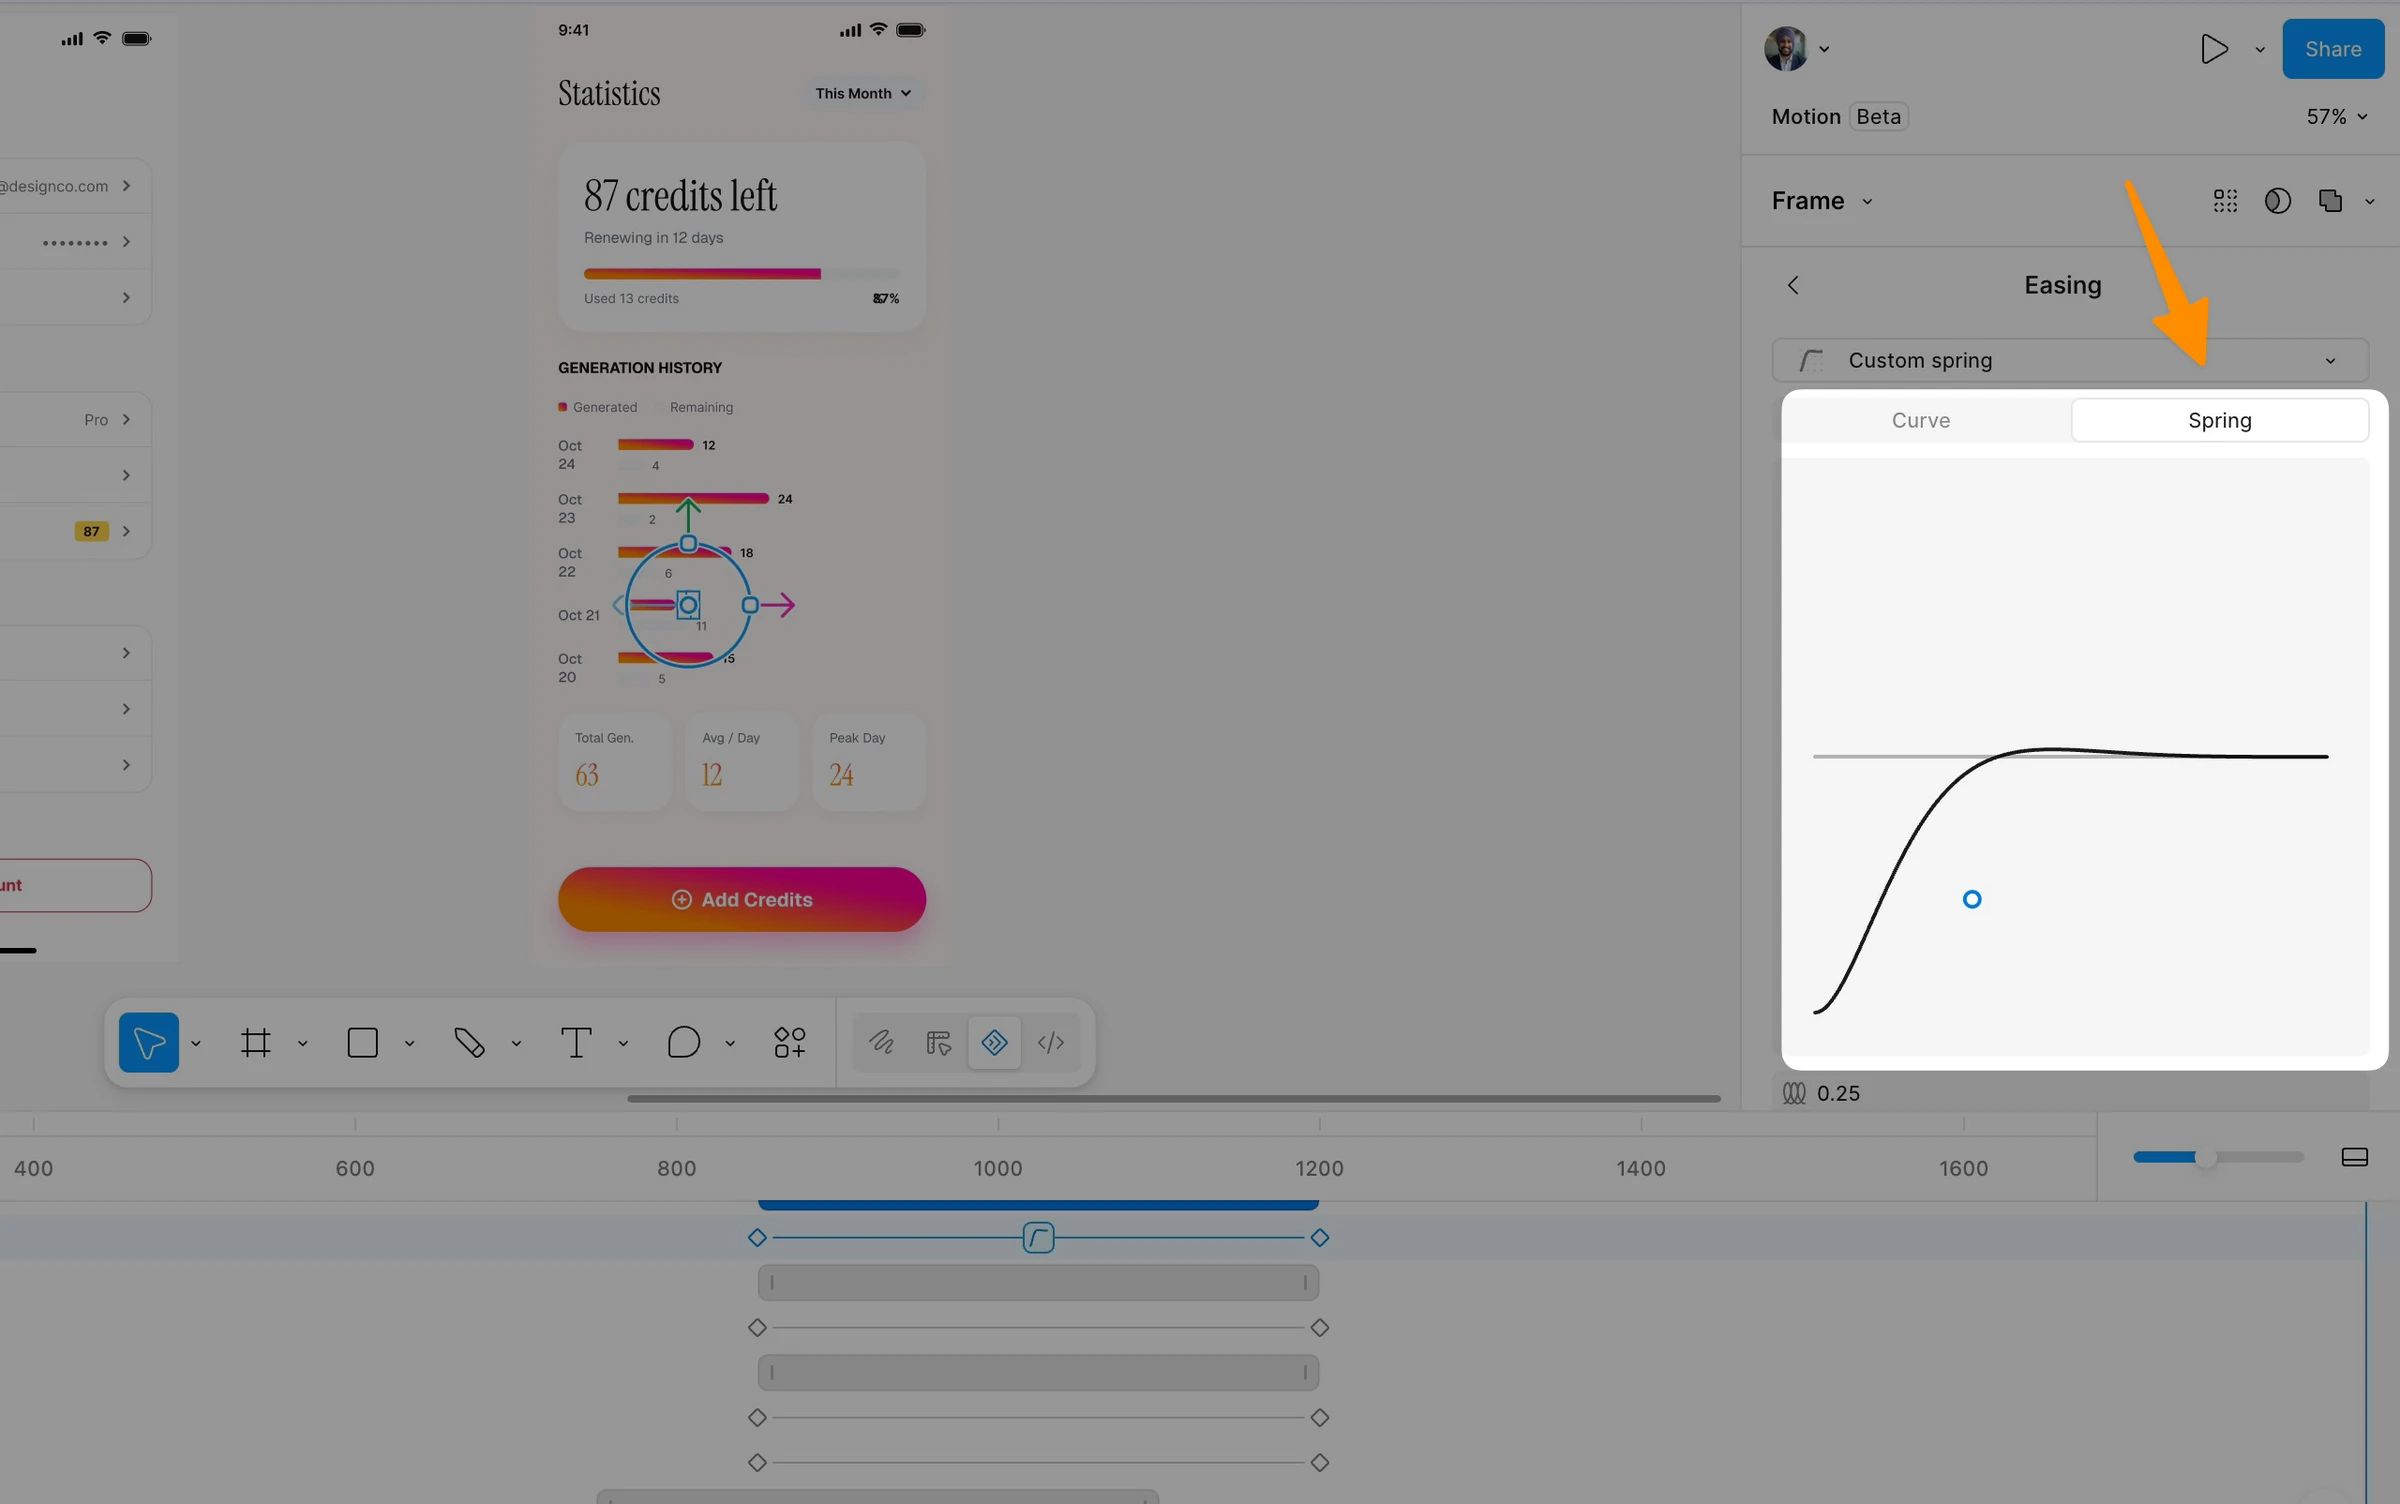
Springs are physics-based easings that simulate a physical spring. They feel more natural than Bézier curves because they respond to the magnitude and velocity of the change rather than following a fixed curve.
Figma Motion includes four Spring presets: Gentle, Quick, Bouncy, and Slow. Each represents a different combination of stiffness, damping, and mass. You can modify any spring preset by entering custom values.
The key property to understand is bounce. A bounce value of 0 produces a critically damped spring with no overshoot. Higher bounce values produce increasingly exaggerated oscillation. For production UI, I stay between 0.1 and 0.35. For playful marketing animations, I'll push to 0.5 or higher.
When I need consistent spring feel across a design system, I create a spring with exact custom values and save it as a variable. That variable can then be applied across every animated component in the system.
Custom Easing with Motion Variables
Motion variables let you save any custom easing value, whether Bézier or Spring, as a reusable variable in your Figma file. This is one of the most powerful features in Figma Motion for design system work.
Create an easing variable in the Variables panel. Name it something semantic like --easing-entrance or --spring-snappy. Apply it to any keyframe across your file. When you change the variable value, every keyframe that references it updates at once.
You can create variable modes for your easing variables. For example, a --spring-bounce variable might have a "Playful" mode with a bounce of 0.4 and an "Enterprise" mode with a bounce of 0.1. Switch the mode at the page level and every animation using that variable instantly shifts personality.
This is exactly how design tokens work for color and typography. Now motion has the same system-level control.
Animated Components and Motion Variables
Building Animated Components

You create animated components the same way you create standard Figma components. The official animated components guide walks through the full workflow.
Select your animated layers in Design mode (not Motion mode, this is important), right-click, and choose Create Component, or use the shortcut Option+Command+K on Mac.
Figma nests the layers in a component frame and marks it with the purple component icon in the Layers panel. The animation you built in Motion mode travels with that component.
The key constraint to understand: you can create components in Design mode only. You build the animation in Motion mode, then switch back to Design mode to componentize it. Component properties also can only be modified in Design mode, not while in Motion mode.
Using Animated Component Instances
When you place an instance of an animated component in another frame, it appears as a purple layer track on the timeline. You can drag it to reposition it in time, which lets you sequence multiple animated component instances in a scene.
Here's where it gets powerful: you cannot edit the animation properties at the instance level. The animation lives in the main component. This is by design. It enforces consistency, every instance of your animated button has the same easing and timing, just like every instance has the same corner radius.
When you need to update the animation, go to the main component, update it there, and every instance across the entire file updates. This is atomic motion design at the system level.
Publishing to Your Design System
Once you've created animated components, publish them to a shared library just like any other component. Team members who link to your library get the animations included.
Any team member who uses an instance of your animated component in their file gets the animation. They can reposition when it plays in their scene, but the core animation stays consistent. Motion becomes part of the design system, not a separate artifact that lives in someone's After Effects project.
This changes how motion design scales in large organizations. Instead of one motion designer creating one-off animations for every feature team, they build a system. Other designers can use it without needing motion expertise.
The Figma AI Agent for Motion
Watch video above to see how you can generate UI Animation with Agent mode and turn it into ship-ready code using Claude Code.
How the Agent Works
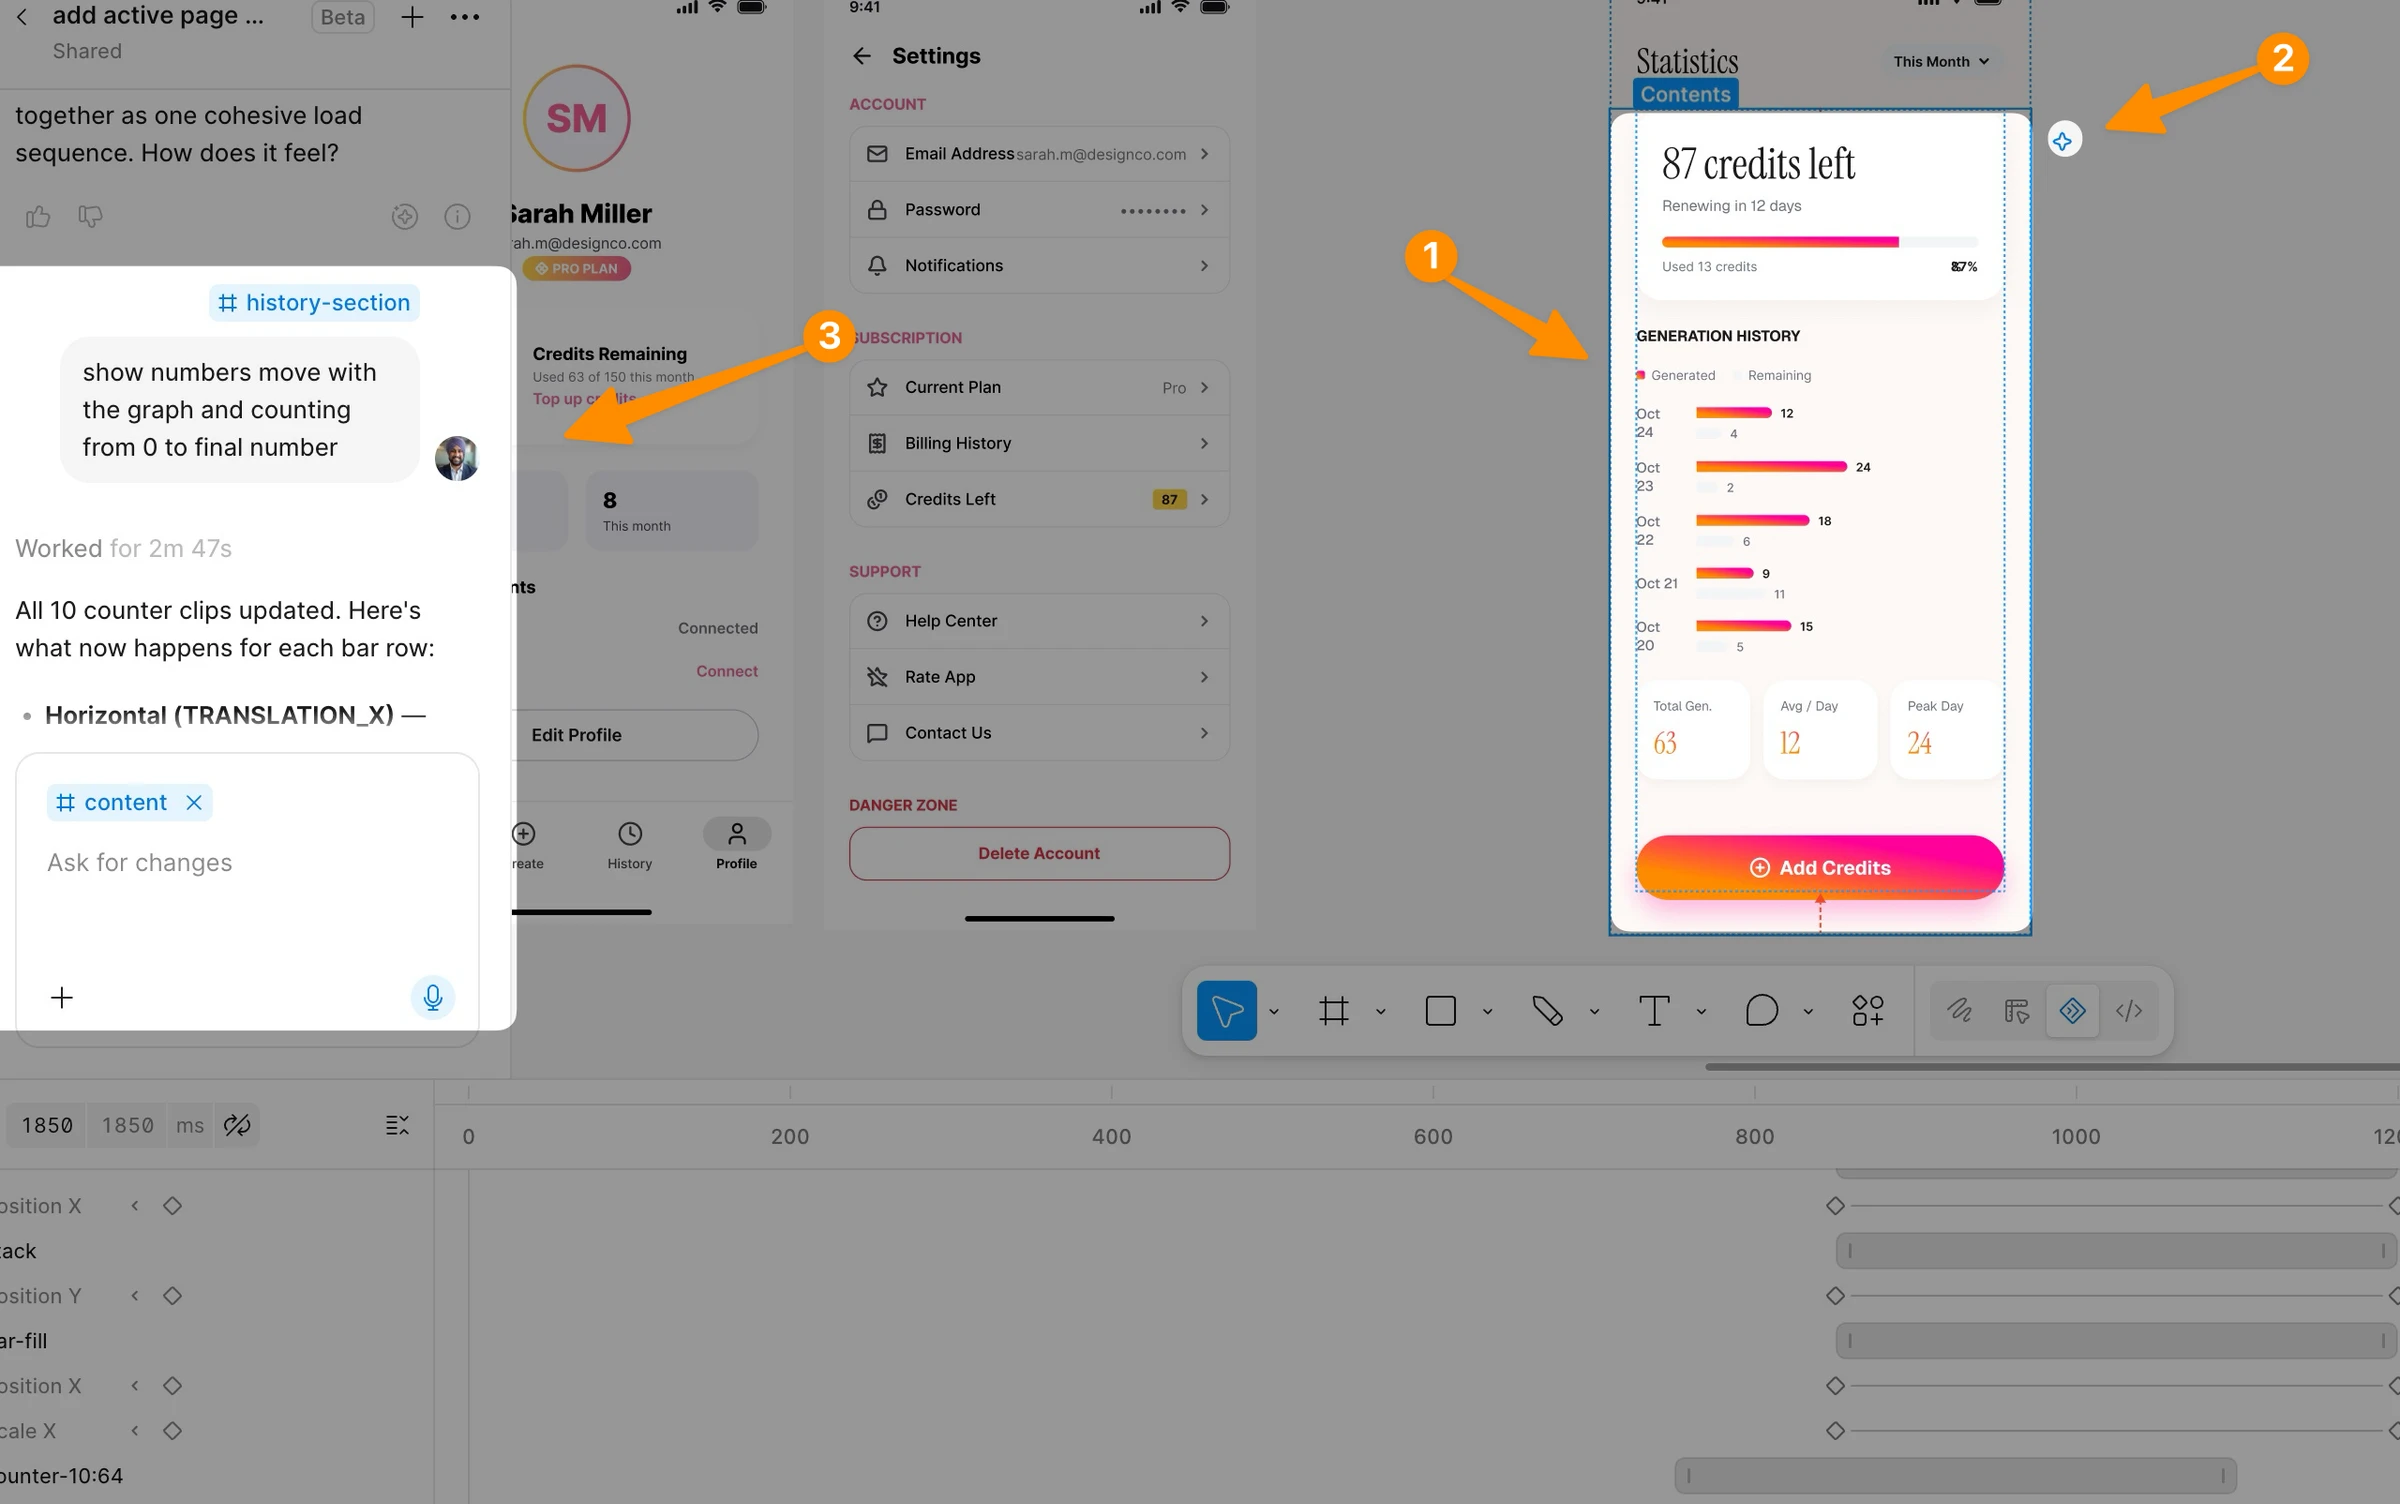
The Figma agent for Motion accepts plain English descriptions and builds real keyframes on your timeline. You don't get a suggested mockup or a generated image, you get actual keyframes with actual easing curves applied to your actual layers.
To use it, open the AI panel while in Motion mode, type your description, and click run. The agent reads your existing layers and tokens, then adds or modifies keyframes to match your description. You can run multiple prompts simultaneously, so you can have the agent working on three different frames at the same time while you work on something else.
After the agent runs, you see the keyframes on the timeline. You can edit any of them directly, adjust the easing, move the timing, or reject the result entirely and try a different prompt.
For Atlassian's Lead Product Designer Davy Fung, the agent was a feedback loop: "When I was animating a banner, I prompted the agent to give me suggestions on what was working, and what wasn't." The agent isn't just a generator, it's a collaborator that can critique and suggest.
The Prompt Framework That Gets Results
After testing dozens of prompts, I've identified the key elements that make the difference between a vague result and exactly what you wanted:
1. What to animate: Name specific layers or groups. "Animate the bars in the chart" is better than "animate the chart."
2. What to keep static: Tell the agent what NOT to animate. "Animate the bars, not the axes, labels, or container" prevents the agent from adding unwanted keyframe noise.
3. The motion feel: Use descriptive words: snappy, playful, cinematic, bouncy, deliberate, data-driven.
4. Duration context: Specify if you want all variants at the same duration, or if timing should vary.
5. Number of variants: If you want the agent to explore options, ask for a specific number: "Create 3 variants."
Here's the full prompt framework as a table:
| Element | Example |
|---|---|
| Number of variants | "Create 3 motion variants" |
| Elements to animate | "Animate the colored bars as one shape" |
| Elements to exclude | "Not the axes, gridlines, labels, or container" |
| Feel per variant | "One snappy, one playful with a bounce, one cinematic" |
| Properties to vary | "Vary the easing and stagger between variants" |
| What stays constant | "Keep the total duration consistent across all three" |
Use this framework and your results will be specific enough for production use on the first or second try.
Official AI Agent Prompts (Copy These)
These three prompts come directly from Figma's official AI workflows documentation. I've tested all three and they work exactly as described.
Prompt 1: Explore motion variants for a chart
Create 3 motion variants for this stacked bar chart. Animate the groups of colored bars as one shape, not the axes, gridlines, labels, or container. Each variant should have a distinct feel: one snappy and data-driven, one playful with a bounce, one cinematic and deliberate. Vary the easing and stagger between variants but keep the total duration consistent across all three.
This prompt is ideal for any data visualization. It gives you three direction options with distinct personalities. You pick the one that fits your product's tone, then refine from there.
Prompt 2: Apply consistent style across multiple charts
Apply the same animation style as the monthly spending chart to the other chart designs. For each chart, reveal the data in the direction it flows: vertical bars grow up from the baseline and horizontal bars grow left to right. Ensure that these all animate together on the same duration.
This is the prompt I use when I've nailed one animation and need it applied consistently across an entire dashboard. The agent reads the reference animation and replicates the feel across every selected element while adapting the direction logic to each chart type.
Prompt 3: Bulk easing update across all keyframes
Change the easing on every keyframe across all selected frames to a custom spring with a bounce of 0.35. Keep all keyframe values and timing positions exactly as they are.
This prompt is a game-changer for late-stage refinement. Your entire animation is built, the timing is right, but the feel is off. Run this prompt and every single keyframe gets updated to the target easing, whether that's 10 keyframes or 100+. It preserves all your values and timing. Only the easing changes.
Advanced Agent Workflows
Beyond these three starting points, here are prompt patterns I've found effective across different use cases:
Entrance animation for a modal:
Animate this modal entering from the bottom of the screen. It should scale up from 95% to 100% while fading in over 300 milliseconds. Use an Ease Out Back easing with a small overshoot to give it a satisfying landing. Don't animate the backdrop overlay.
Onboarding sequence stagger:
Create a staggered entrance for these 5 card elements. Each card should fade in and slide up by 20px. Start each card 80 milliseconds after the previous one. Use Ease Out easing. The full sequence should complete within 700 milliseconds.
Loading state animation:
Add a looping shimmer animation to these skeleton loading placeholders. The shimmer should move left to right as a gradient highlight. Duration should be 1500 milliseconds. Loop continuously.
Navigation transition:
Animate this page transition. The outgoing screen should slide left by 100% of its width over 250 milliseconds with Ease In easing. The incoming screen should start at 100% to the right and slide to 0 over 250 milliseconds with Ease Out easing. Both animations start simultaneously.
Micro-interaction for a button:
Add a press animation to this button component. On the press frame, scale it down to 96% and darken the background by 10%. Transition should be immediate (30 milliseconds) with Linear easing. The release should spring back to 100% with a Gentle spring.
When you're using the agent for bulk operations, be specific about what you want preserved. The agent follows your instructions literally, so if you say "update all keyframes," it will update every one. If you only want specific layers touched, name them explicitly.
25 Real Use Cases for Figma Motion
One of the things I appreciate most about Figma Motion is how broad its application is. Here are 25 specific use cases I've either tested myself or seen documented by the Figma team.
UI Micro-Interactions
Page Transitions and Onboarding
Data Visualization Animations
Marketing and Brand Motion
Dev Mode Handoff: From Design to Code Without Losing Details
Inspecting Animations in Dev Mode
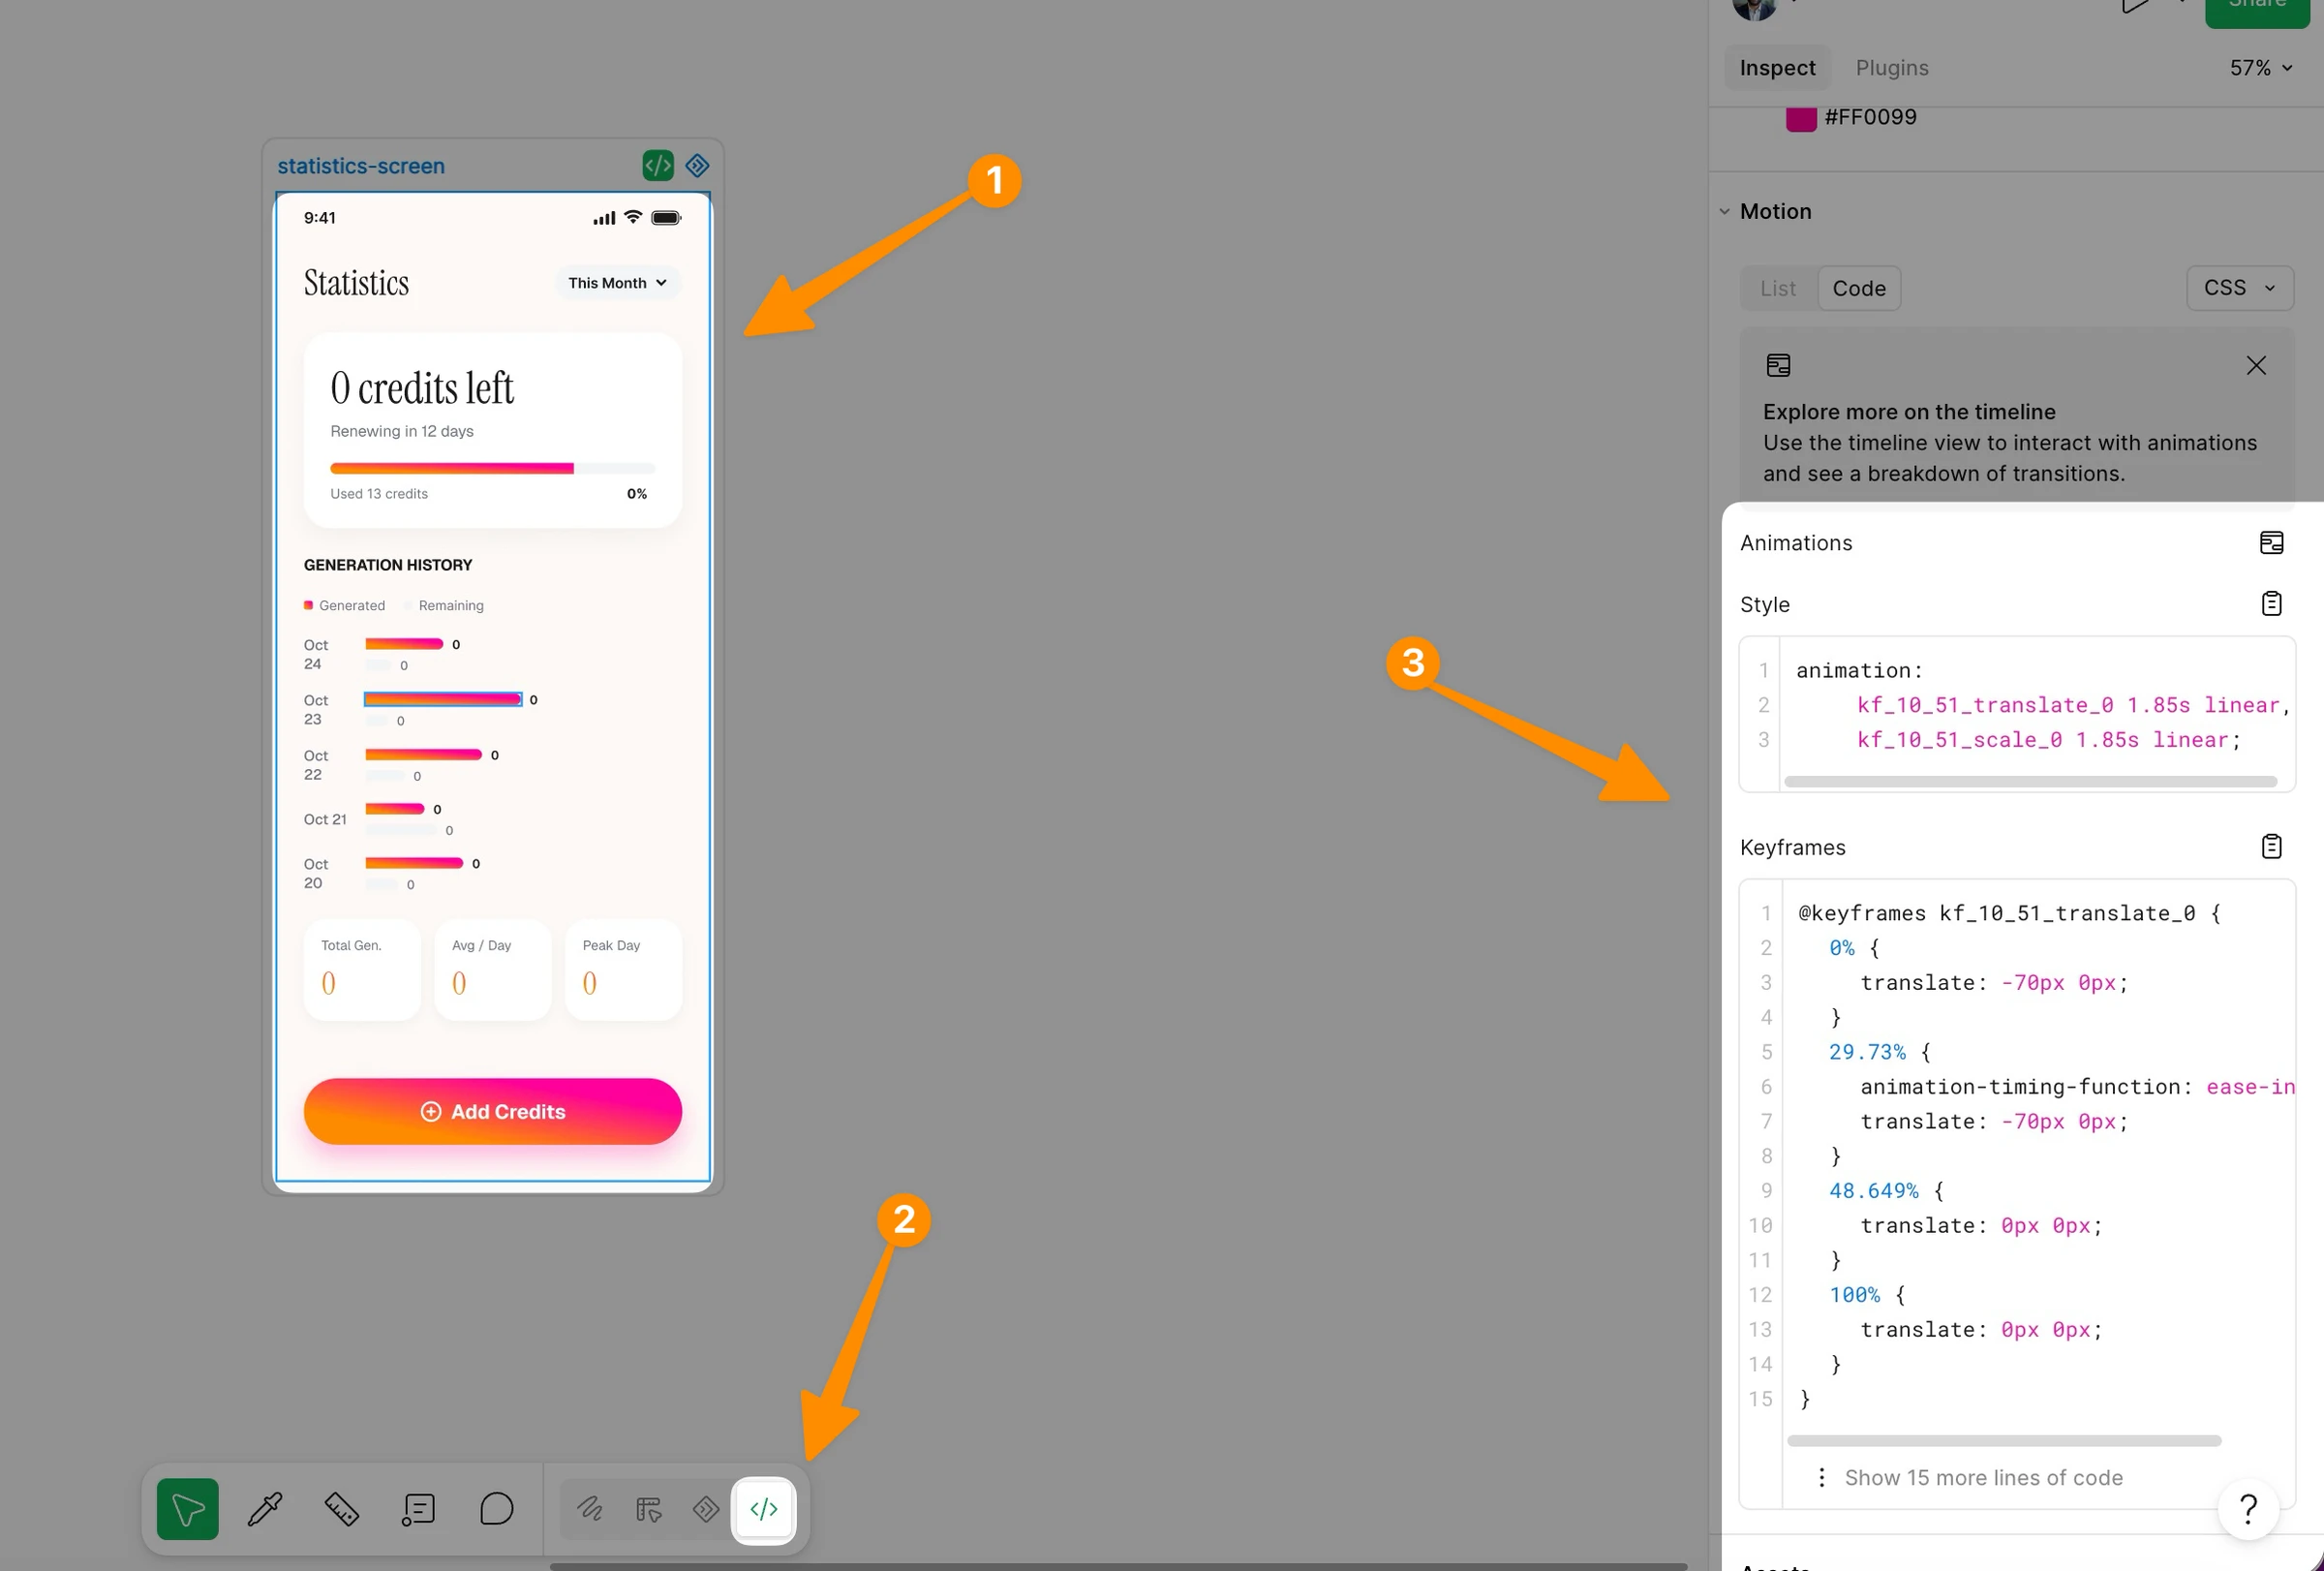
This is where Figma Motion earns its place in the production pipeline. See the official Dev Mode handoff guide for full details. After you've built an animation in Motion mode, developers can switch to Dev Mode and open the Motion tab in the Inspect panel.
The Motion tab shows the full timeline in read-only view. Every layer, every keyframe, every easing curve is visible and accurately represented. Developers see exactly what was designed, not a screenshot, not a description, but the actual animation data.
The Timeline view is accessible by clicking "Show in timeline view" in the Motion tab. This lets the developer scrub through the animation to verify it matches the design intent frame by frame.
For teams where developers are also building the implementation, this inspection view dramatically reduces back-and-forth. The developer can see exactly what easing was used, exactly what duration was set, and exactly what property values change.
Copy CSS, JSON, and React Code
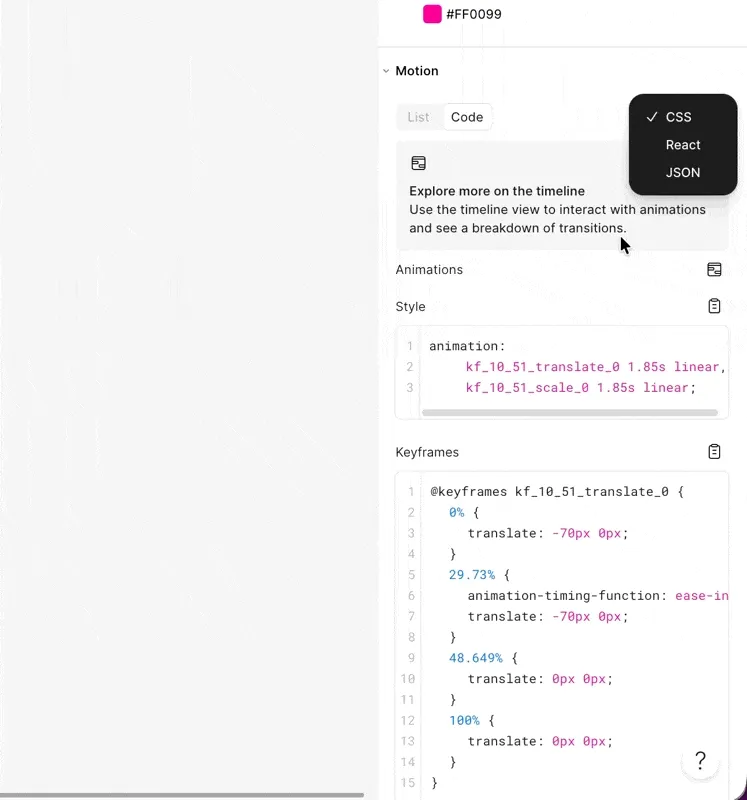
From the Motion tab in Dev Mode, developers can copy the animation as production-ready code. The default output is CSS, but you can switch between three formats:
CSS: Standard CSS @keyframes declarations with animation properties. Works in any web project without dependencies.
JSON: Raw animation data structure. Useful for feeding into JavaScript animation libraries or custom renderers.
React: Framework-ready React code using motion.dev (formerly Framer Motion). This outputs a complete React component with the animation applied using the motion wrapper.
For the CSS output, you get the @keyframes block with all the keyframe values, plus the animation shorthand with the duration, easing, and playback mode. The easing is expressed as a cubic-bezier() value for Bézier curves or as a custom property for springs.
Previously, developers got a screenshot of an After Effects timeline and had to manually transcribe the easing into CSS. Now they click Copy and paste it into their file. Nothing is lost in translation.
Using the Figma MCP Server
Figma Motion is fully compatible with the Figma MCP server. For teams using AI-assisted development tools (Claude, Cursor, GitHub Copilot, etc.), this is the most powerful part of the handoff story.
In Dev Mode, MCP details appear in the Inspect panel. The developer copies the frame link and provides it to their coding agent. The MCP server supplies the full animation context including keyframes, motion type, timing values, and easing curves.
The coding agent can then generate an implementation that precisely matches the animation as designed. No guessing, no approximation. The agent has the same data the developer has, plus the ability to write the code implementation directly.
For my team, this reduced animation implementation time from hours to minutes on most interactions. The developer still reviews and may tweak, but the starting point is right.
Exporting Animations from Figma Motion
Video Formats: MP4 and WebM
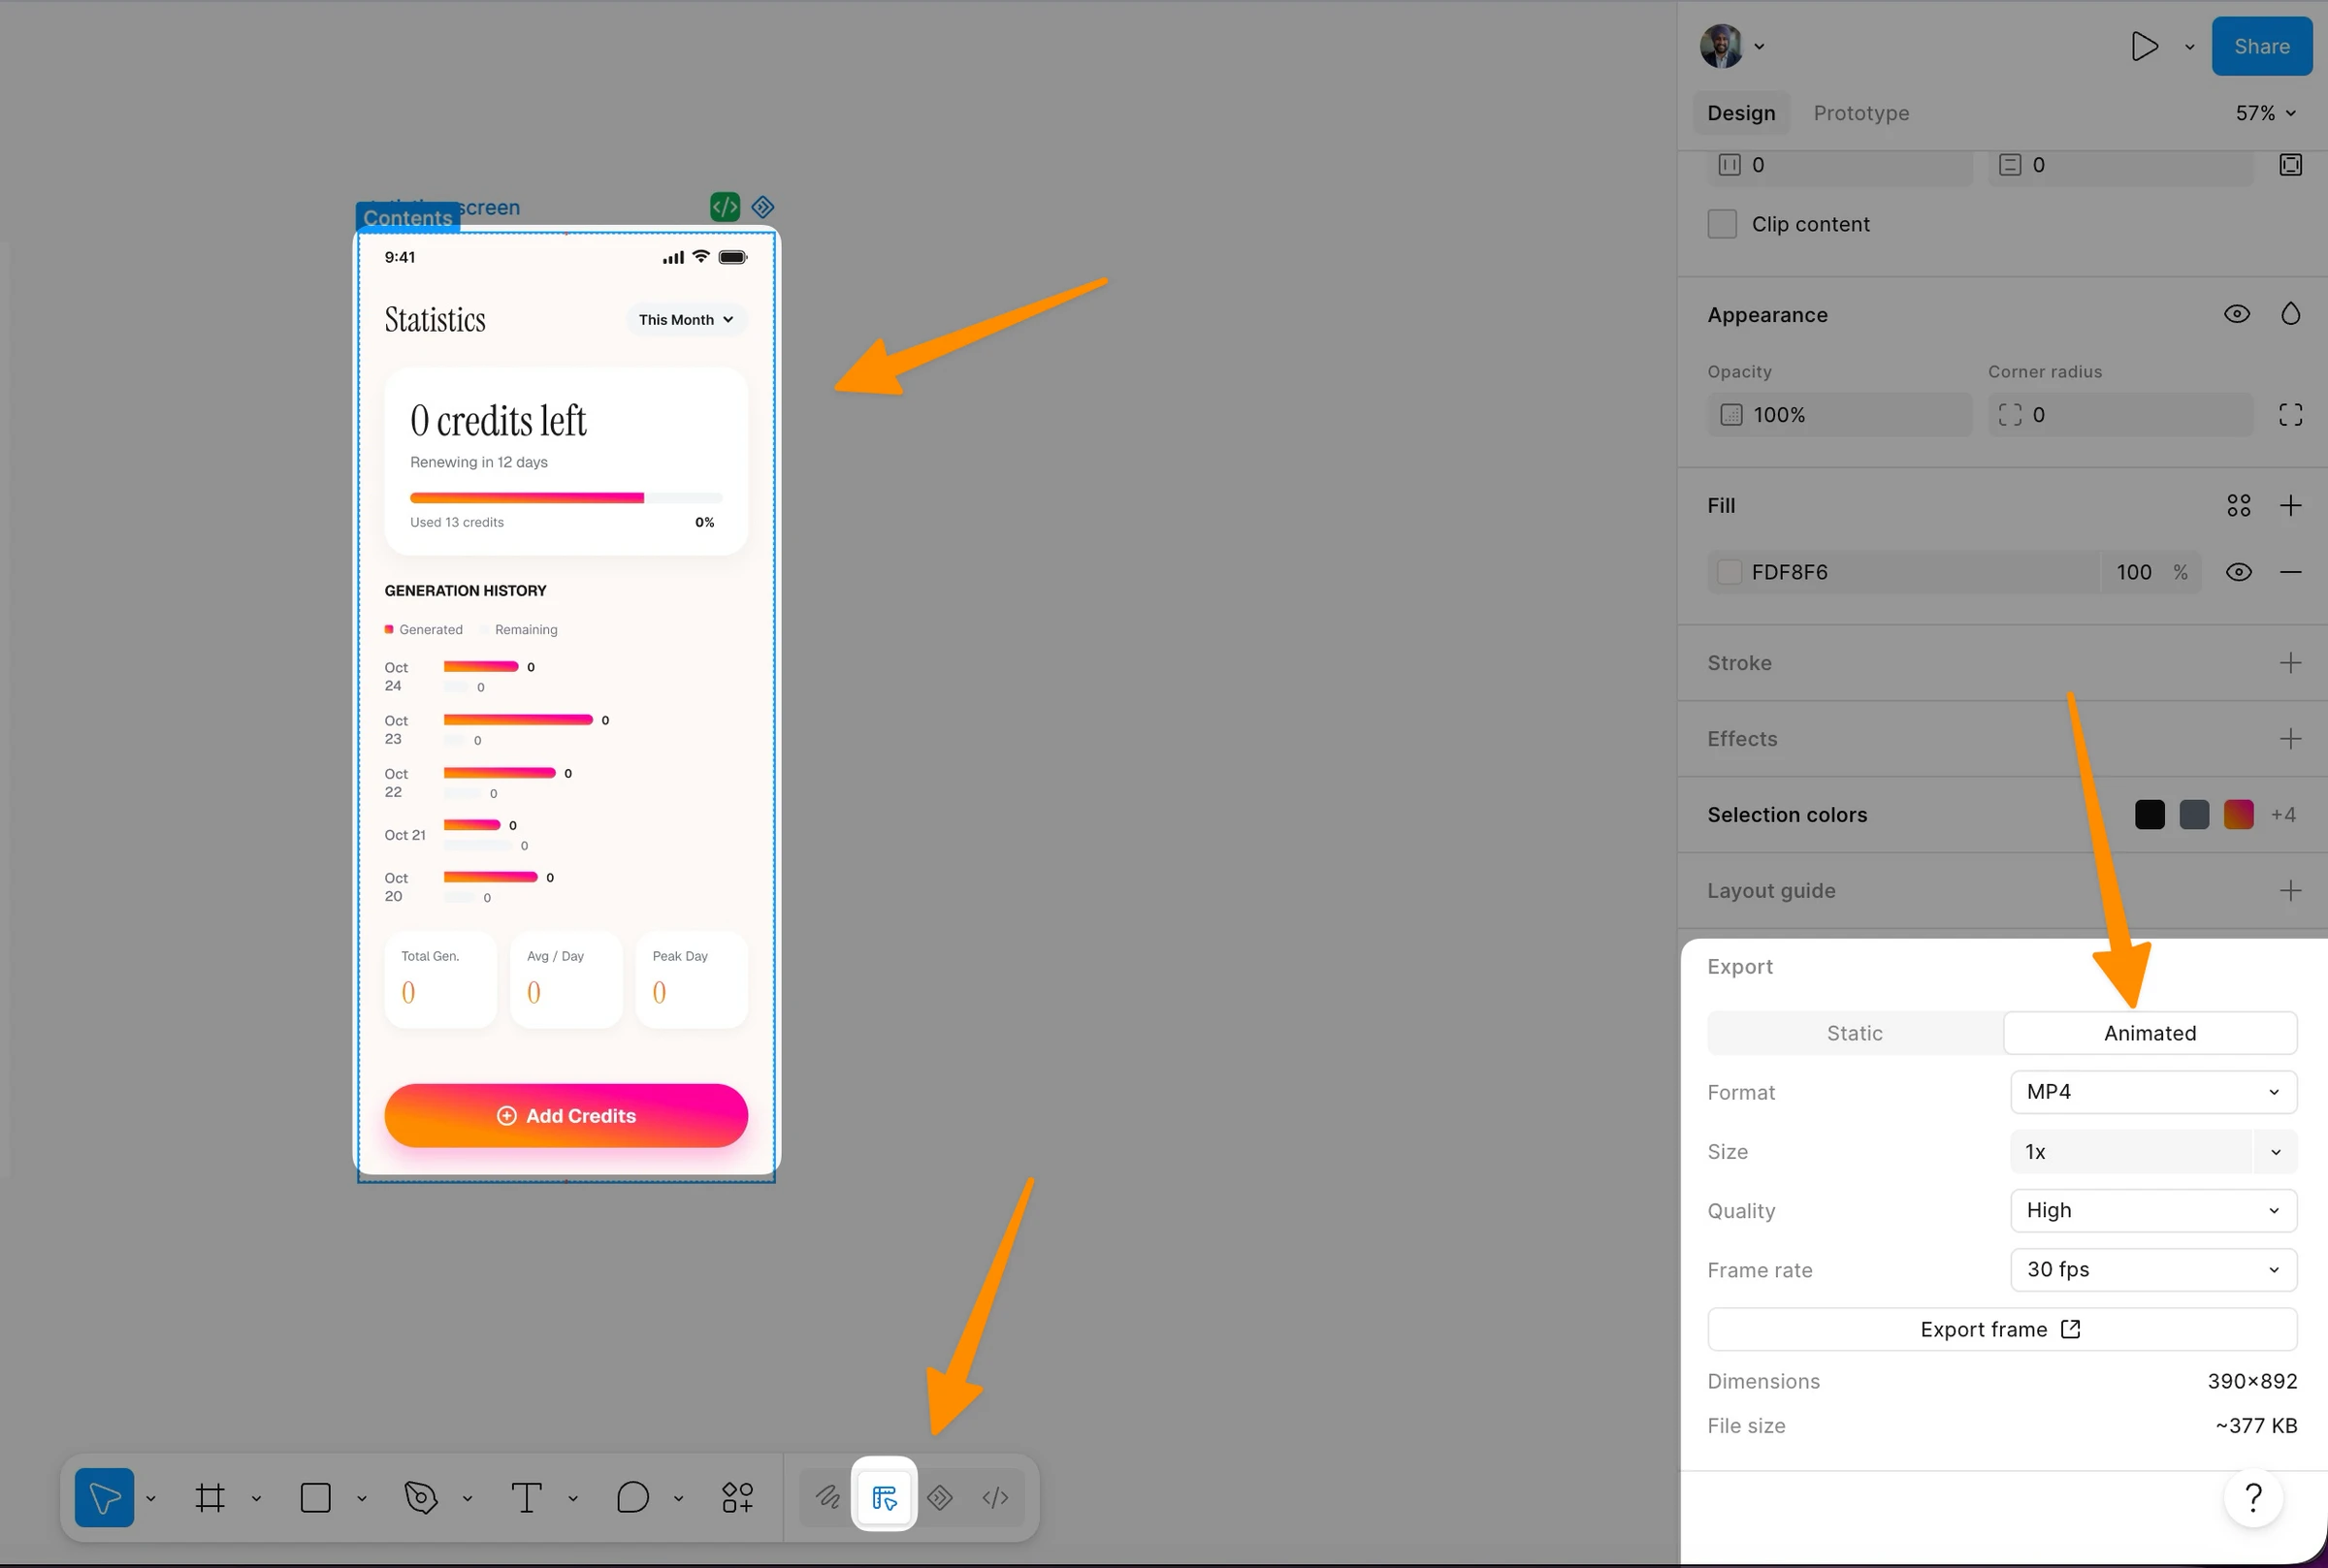
MP4 and WebM exports are ideal for getting early alignment with stakeholders. The full export documentation lists all available settings., including animations in presentations, or publishing to social media and marketing channels.
To export, select the animated frame, go to the Export section in the right sidebar, and switch to the Animated tab. Choose MP4 or WebM, set the size and frame rate, and adjust quality (higher quality = larger file size).
By default, exports are available at up to 1920x1080 resolution at 30 FPS on all plans. Exports larger than that or above 30 FPS require a paid plan.
MP4 is the right choice for presentations, social media platforms, and anywhere a standard video format is expected. WebM is better for web embedding, as it has better compression and transparency support.
Animated Assets: GIF and SVG
GIF export is useful for two things: email marketing (GIF has wider support in HTML email than video) and messaging platforms like Slack where GIFs play automatically.
When exporting GIF, enable the Loop option if you want it to repeat continuously. Keep in mind GIF has a 256-color limit, so for animations with gradients or photography, the quality will be noticeably lower than MP4.
Animated SVG is the format I'm most excited about. SVG animations are vector-quality at any screen resolution, have small file sizes, and can be styled with CSS. They work natively in the browser without any JavaScript. For icon animations and simple UI motion assets, animated SVG is the best output available.
What's Coming: 3D Transforms and Lottie
Figma has confirmed that 3D transforms are on the roadmap, with a waitlist open as of Config 2026. This feature will let you rotate frames, vectors, and text on the z-axis with native controls. Every 3D transform will be keyframable on the Motion timeline and exportable to CSS.
The combination of 3D transforms with motion will make it possible to prototype spatial interactions that weren't possible in Figma before, card flips, perspective menus, depth-based transitions.
Lottie support is also planned but not yet available in the beta. Lottie is the standard format for animated assets in mobile development (iOS, Android), and when it ships, it will complete the handoff story for native app teams.
Figma Motion vs After Effects: The Honest Comparison
When Figma Motion Wins
UI animation and micro-interactions: Figma Motion was designed for this. Your components are already in Figma, your tokens are already in Figma, your team is already in Figma. The friction of building motion in a separate tool was always artificial.
Design system motion: The animated component system and motion variables in Figma Motion have no equivalent in After Effects. You can't build a shared motion library in After Effects that designers can consume as reusable components.
Developer handoff: Figma's Dev Mode integration gives developers ready-to-paste CSS, JSON, and React code. After Effects gives developers a video file and a hope.
Collaboration: Time-based comments on the Figma canvas let anyone comment on a specific frame of an animation. This is impossible in After Effects without exporting a video.
Speed: For a simple entrance animation or micro-interaction, I can go from idea to approved in Figma Motion in under 10 minutes. The same task in After Effects takes 30 minutes minimum.
AI-assisted creation: The Figma agent generates real keyframes from text descriptions. There is no equivalent in After Effects.
When After Effects Is Still the Answer
VFX and compositing: After Effects is a compositing tool. If you're working with video, particle effects, or complex motion graphics with real media, it has no rival.
Complex character animation: After Effects with tools like Duik Bassel supports inverse kinematics, character rigging, and puppet animation. Figma Motion doesn't have these capabilities.
3D animation (current state): Until 3D transforms ship in Figma Motion, After Effects is still needed for z-axis work. Even then, After Effects' camera controls and 3D space manipulation go far beyond what Figma will offer.
Broadcast and film: If your animation is going on television or in a film, After Effects is the industry standard.
For most product designers doing UI motion, Figma Motion handles 80-90% of what you were using After Effects for. The remaining 10-20% is specialized work that After Effects does uniquely well.
Figma Motion Pricing and Plan Access
Figma Motion is available on all plans in open beta, with different capabilities based on your plan level:
Starter (Free):
Professional and above (Paid):
Dev Mode access for animation inspection is available on all paid plans and requires a Full or Dev seat. This means developers can inspect animations and copy code without needing a full design seat.
As Figma Motion exits beta, these tier details may change. The best source for current pricing is the official Figma pricing page.
Figma Motion AI Agent: Advanced Prompting Techniques
Prompts for Common UI Patterns
Beyond the official examples, here are additional AI agent prompts I've built and tested for specific UI patterns:
Loading skeleton shimmer:
Add a looping shimmer effect to these skeleton placeholder elements. The shimmer should be a highlight that sweeps from left to right across each element. Duration should be 1500 milliseconds. Use Linear easing. Stagger the start time of each skeleton by 200 milliseconds so they don't all shimmer at the same time. Loop continuously.
Hero section stagger:
Create an entrance animation for this hero section. Animate the headline first, fading in from 10px below its final position over 400 milliseconds. Then animate the subheadline starting 150 milliseconds after the headline starts, using the same motion style. Finally, animate the CTA button 150 milliseconds after the subheadline starts. Use Ease Out easing for all three elements.
Notification toast:
Animate this notification toast component entering from the top right of the screen. It should slide down from -100% of its height to its final position while fading in. Duration: 350 milliseconds. Use Ease Out Back with a bounce of 0.2 to give it a satisfying landing. Don't animate any child elements inside the toast.
Tab switching:
The active indicator under these navigation tabs should animate from its current position to the new active tab when the active state changes. Animate just the indicator element sliding horizontally. Use a Quick spring. Keep all other elements static.
Data table row reveal:
Create a staggered entrance for these table rows. Each row should fade in and slide in from the left by 12px. Stagger each row by 30 milliseconds. The entire sequence should complete in under 600 milliseconds. Use Ease Out easing. Don't animate the table header row.
Working with the Agent Iteratively
The agent works best in a conversation. Start with a high-level prompt, review the result, then refine with specific follow-up prompts:
Round 1: "Create an entrance animation for these dashboard cards. Each card should fade in and slide up. Use Ease Out easing."
Review: The timing feels too slow.
Round 2: "Reduce the duration of each card animation to 250 milliseconds. Keep all other properties the same."
Review: The stagger between cards is too long.
Round 3: "Reduce the stagger between each card from the current value to 50 milliseconds."
This iterative approach lets you dial in exactly what you want without having to specify everything in one massive prompt. Each round builds on the previous result without touching keyframes you're happy with.
Motion Design Fundamentals: What Makes Good Animation
If you're new to motion design, Figma's Motion Design Fundamentals collection covers the principles that separate good animation from bad animation. Here are the key concepts:
Timing tells the story: Fast animations (150-200ms) feel responsive. Medium animations (250-400ms) feel deliberate. Slow animations (500ms+) feel cinematic or ceremonial. Match the speed to the context.
Easing adds personality: Linear motion feels robotic. Ease Out feels natural (like an object decelerating after being thrown). Springs feel physical. Your easing choice communicates your product's personality.
Direction communicates hierarchy: Elements entering from below feel like they're rising in importance. Elements exiting to the left feel like they're being dismissed. Use direction intentionally.
Stagger creates flow: When multiple elements animate together, staggering their start times by 40-80ms creates a feeling of sequence and rhythm. Without stagger, they feel like a single flash of movement.
Animation serves the user: Every animation should have a purpose: confirming an action, showing a state change, guiding attention, or communicating loading progress. Decoration for its own sake is noise.
Figma Motion makes all of these principles accessible without needing to understand animation software. The presets encode these principles, and the AI agent applies them intelligently when you describe your intent.
Frequently Asked Questions
Is Figma Motion free to use?
Figma Motion is available in open beta on all plans, including the free Starter plan. Free plan users get access to the timeline, keyframes, presets, and easing controls. Exporting animations larger than 1920x1080 or above 30 FPS requires a paid plan. The AI agent for motion and design system features (animated components, motion variables) also require a paid plan.
Can I use Figma Motion to replace After Effects for UI animation work?
For most UI animation work, micro-interactions, page transitions, component animations, and design system motion, Figma Motion handles the full workflow better than After Effects because it keeps everything in one file. After Effects remains superior for compositing, video work, character animation, and complex 3D effects. About 80-90% of what product designers use After Effects for can now be done in Figma Motion.
How does the Figma AI agent for motion work?
The Figma agent reads your existing layers, components, and tokens, then adds or modifies keyframes on the timeline based on your natural language description. It creates real keyframes with real easing curves, not a mockup or a suggestion. You can run multiple prompts simultaneously, and you can edit any keyframe the agent creates directly after it runs.
Does Figma Motion support Lottie export?
Not yet as of June 2026. Lottie support is on the roadmap but has not shipped in the beta. You can currently export MP4, WebM, GIF, and animated SVG. For web implementations, Dev Mode gives developers CSS, JSON, and React code they can paste directly.
Can developers inspect Figma Motion animations without a design seat?
Yes. Developers need a paid plan with either a Full seat or a Dev seat to access Dev Mode. From Dev Mode, they can open the Motion tab to inspect the full animation timeline and copy the code in CSS, JSON, or React format. The Figma MCP server also provides full animation context to coding agents.
What animatable properties does Figma Motion support?
As of the open beta, Figma Motion supports keyframing position (X and Y), scale, rotation, opacity, and anchor point. Shader effect parameters exposed as sliders can also be keyframed on the motion timeline. 3D transforms (z-axis rotation) are on the roadmap but not yet available.
How do animated components work in a design system?
You create an animation in Motion mode, then switch to Design mode to turn the animated layers into a component. Publish the component to a shared library and any team member who uses an instance gets the animation included. Animation properties can only be edited at the main component level, instances inherit the animation and can only be repositioned in time.
Final Thoughts
Figma Motion is the most significant change to the UI design workflow I've seen since Figma introduced auto layout. It doesn't just add animation to Figma, it eliminates an entire category of tool-switching that was costing product teams hours every sprint.
The AI agent is the feature that will get the most attention, and deservedly so. Being able to describe an animation in plain English and get real keyframes on the timeline is genuinely different from anything I've used before. But the animated components and motion variables system is the feature that will have the most impact over time. Motion becoming part of the design system, traveling with components, consistent by default, inspectable at full fidelity, changes what's possible for teams building at scale.
Start with the preset animations to get familiar with the interface. Move to manual keyframes when you need precision. Use the AI agent when you need to explore directions quickly or apply consistent changes across many layers. And use Dev Mode and the MCP server to close the gap between what you designed and what actually ships. Try it yourself in Figma's official playground file.
The animation you spend hours perfecting now has a direct path to production code. Use it.